
The Battle for Gilneas is one of three new PvP battlegrounds introduced in Cataclysm. It is a relatively straightforward 10v10 resource match between the Horde and Alliance, set in the wonderfully gloomy atmosphere of Gilneas. There are three nodes to control – the Lighthouse (LH), Waterworks (WW), and Mine – and each node generates resources for your side. Each node has a flag you need to click and channel for a few seconds to capture. The more nodes you control, the faster your team gains resources. First team to 2000 resources wins.
If this sounds like a 10-man, 3-node Arathi Basin, well, that’s because it is. This is a half-court AB, designed to be fast and engaging.
Let’s take a look at the topology of the battleground.

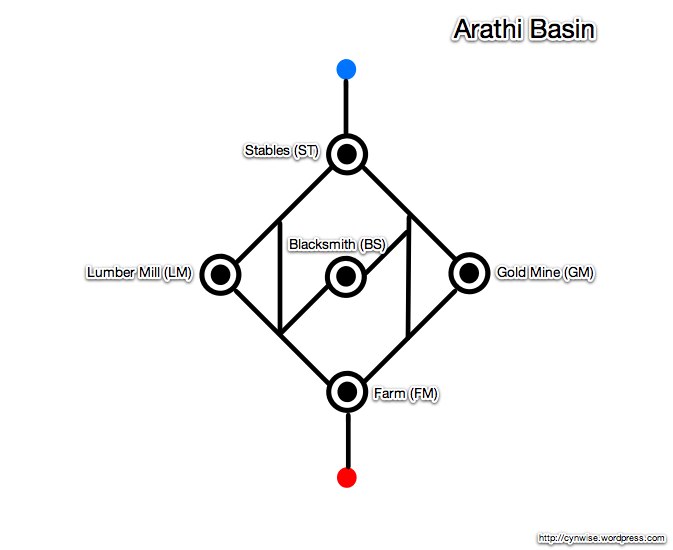
If you haven’t seen one of my topological maps before, I go into a lot more detail in their original post, but the general idea is to only present the logical flow between objectives. Large circles are capturable nodes, small filled in circles are graveyards, and colored circles are graveyards which do not change control. Squares are important locations, but non-capturable. Terrain is pretty much ignored.
Looking at the map, calling BfG “a half-court AB” isn’t really a joke – it’s the AB map cut in half, with the Blacksmith removed. The three nodes are arranged in a rough triangle, with the Overlook in the center. Capture two of the nodes and hold them to win. Any two will do.
The Overlook is one of the more interesting elements of the Battle for Gilneas. It has no flag, no resources – but you can see every single node from it. This is something that sets BfG apart from AB – the ability to actually see every flag from a single point. In AB, at least two nodes are always hidden from sight from the absolute best vantage points (Farm, Lumber Mill, Stables). Not so from the Overlook. There is a tactical advantage to holding this spot, though it comes at the cost of not fighting near a flag.
The flow of this battleground is, thankfully, very linear. You are fighting within a triangle to capture nodes at each point. In the center is a vantage point that lets you see what is going on, but ultimately you will shift your team around the triangle.

The terrain in this battleground is really well done. While the flow of the battle is deceptively simple, the terrain is varied and forces you to become acquainted with the numerous choke points and obstacles between each node. A river cuts through the southern part of the map, encircling the Waterworks, but is not a huge impediment. The area around the Overlook is full of gullies and ridges, perfect for funneling your opponents into traps and area of effect spells.
Like with any other battleground, I encourage you to just run around on the map and see what it’s like. You can experience it without the thrill of combat using the new War Games feature.
WINNING THE BATTLE FOR GILNEAS
I am absolutely serious about this: you want to win, fight at the flag.
I am amazed at how many people I see who have apparently forgotten how to fight at the flag in my short time in this battleground. The attackers let themselves get pushed away, intercepted before they ever come close to capping the node. The defenders let themselves get lured away down the road to the Overlook, until half the team is fighting over a piece of land that only has intelligence value, while the node gets capped behind them.
That kind of behavior doesn’t fly in Arathi Basin, and it won’t fly in Gilneas, either.
Get to know the terrain. If you’re attacking, use the buildings around the various nodes to mask your approach. Approaching from the Water Works seems to have more cover than the Overlook. Get between the flag and the graveyard and force the defense away from the flag. Make it so the rezzing defenders have to go through you to get back to the node.
Defense, intercept them away from the flag, but then fall back and do not chase. Don’t get caught up in the thrill of it all and let them sneak around to cap the undefended node.
Reinforcements arrive quickly in BfG, so call out incomings early, often, and as accurately as you can.
If this all sounds like the strategy for Arathi Basin, well, that’s because it’s the same strategy. First to 2000 points wins, after all! The smaller team and map size makes for some pretty intense fights around the flags, with everyone having to contribute to succeed. But it’s basically the same game.
I like the Battle for Gilneas. It’s taken many of the good qualities of Arathi Basin and Warsong Gulch and combined them into a fun game. It fills out the 10v10 bracket nicely, a nice addition to the smaller format that formerly was limited to Warsong Gulch. The rules are familiar, but the map is all different, which makes for an interesting and fun experience.
Just remember – fight at the flag!

Great recap, Cyn! I’d been holding off on the new battlegrounds until I had the chance to read up on them, and had no idea BFG (?) was like AB. I love AB, so it looks like maybe I’ll be spending some time conquering Gilnean soil soon! 😀
Thanks, Rades! It really is a lot of fun, and while it’s a pity that it’s 85-only (would be great as a leveling battleground), it’s a welcome addition to the battleground roster.
That’s the big one right there. I so wish this BG was available to lower levels. I haven’t gotten to spend as much time as I would like in BG’s as I’ve been focusing on other things, but this one actually has the potential to knock AB down and become my favorite BG.
Awesome recap.
So in general, do you think the best “typical” strat is to take 2 nodes and defend them to the death? An equivalent to the Iron Triangle? (<3 LM/BS/Farm) If so, which two nodes do you think are the easiest to hold together?
(In an ideal/average of matches, obvious each one is going to be a little different.)
In general I think you’re better off going for a 3-cap than the 2 and defend, but 2-and-hold is completely viable. If you can take the far node and WW, then your WW team goes and gets the near node, you deny your attackers any graveyards except their spawn point. Then you bottle them up while defending the nearest two nodes to their spawn. (Mine, LH if Ally, LH, WW if Horde). You shuttle forces back and forth along the leading edge of the triangle to keep them at bay while the points rack up.
For 2-cap, I am not sure yet, but I think the LH/Mine might be slightly weaker than WW+1 other, just because the WW has such great LoS protection as well as distance from the spawn point.
I’m really not sure yet, though. Will need some more time to think about it.
I find it really depends on what the opposition is doing as
to whether you should go for the 3 cap or stick with two and def.
If the opposition is strong LH and WW seem to be the easier to hold
and to def (WW because you can LoS around the houses if needs be)
as the opposition mostly comes across the river as opposed to the
back entrance near WW. The losses i’ve had have mainly gone like
this: -We cap LH and WW (WW after quite a long battle). -Horde
switches their majority to LH (let’s say 7 and leaves 3 at mine).
-Alliance moves more troops to LH to counter the zerg leaving 3 at
WW. -Horde manages to overrun and cap LH, alliance forces do not
switch to mine but instead get locked in between the start point
and LH flag. Once the horde has LH and the alliance refuses to
switch they don’t even need to attack WW. We can’t leave it
undefended for fear of the 3 cap and 1-2 of us can’t beat the
respawn timer to cap mine. Alot of the losing games i’ve played
haven’t even had WW attacked in this situation. Adversely if the
horde zerg fails and they continue to try and push LH you can 3 cap
them. This is usually the case when they send most of their forces
to LH. Me and a rogue left a shammy at WW and killed the defender
at mine and got the flag to contested, reinforcements came for mine
but by then it was in our control and we could cc them/kill them
before they could reach us from the boat. I love the AB-esque BGs
but without communication it is very difficult to win. As for twin
peaks, i like it my only gripe is the water entrance into the horde
keep from the right. Not really fair when the alliance one has two
ramps 😛 (Damn this comment is long 0_o)
From what I’ve read and seen the Horde are at a slight disadvantage in this BG. Starting north of the Mine node makes for a longer trip to WW or LH. However, I do not moan and groan about that because it is not far enough away to make a difference on the flag cap. Yes, Alliance may arrive a few seconds before, but one AOE around the flag and it becomes just a battle for the node.
I would say this is my favorite of the new BG’s. If I can get in with a group of 3 guildmates (or more) i’ve never lost. It is much easier to hold the two nodes required when you have instant reaction time in vent. I also know my guildmates know the important of AOE around the flag. It does sometimes mean long boring times guarding the flag. It never seems to fail that the node I choose is the one that doesn’t see any action. I’ll hear about all the fun being had at the other node and jealousy kicks in a bit.
The win is worth more though…
That’s interesting about the distance. What I’ve noticed is that, unlike Arathi Basin (where the Stables ALWAYS goes before the Farm), the Mine sometimes goes before the Lighthouse. I can see if the Alliance head out to the WW immediately and cut across the map they might get there a few seconds before, but, like you said, it’s a temporary advantage at best.
I’m giving Twin Peaks a bit more time before I pass judgement on it, but right now, BfG is definitely a favorite.
Horde can beat Alliance to WW, if they try (ie send some straight there rather than Mines). WW tends to be my 1st destination, solo, just to harass and prevent the flag while we take the other two. Usually by the time I get to WW there are Horde there and it requires ranged mobile AoE to interrupt their 1st cap attempt. (one of the reasons I go, as I have the capability to disrupt even though I am beaten to the node)
Pingback: How to Lose: Battle for Gilnas « Armaggedon's coming!
Pingback: Gnomish Advice On Playing WoW’s New Battleground | MMO Melting Pot
A very nice and handy overview indeed. I admit I’ve had
little time for the new BGs yet and no time for Gilneas, but this
is making me wanna give it a go asap. also – your words in god’s
ear about fighting at the flag. =/
Whoo! I’m glad to see this making an appearance. I love the maps.
Just tried it for the first time after your post Cyn. Totally agree that it is a blast, plus after all the pain that Alliance go through with Tol Barad, it was fun to be in a BG that we could win.
Pingback: Link Love « The Templar's Hammer
BfG is definitely a favourite of the new BGs. I’m not huge on TP… but then again I haven’t really had a chance to run it too many times, so maybe that’s a premature criticism.
The 3 cap strategy is definitely better if you’ve got a partial-full premade… but have you been able to do that with PuGs? If so… I’m very envious of your battlegroup!
I have been able to do it with PuGs.. you just need to be clear up front and get buy in… then keep the comms up.
Cynwise As always, love your posts. One of the best WoW
blogs around and definitely my favorite warlock resource.
Pingback: What I Love About Catacylsm – Patch 4.0.6 « A High Latency Life
Great article! Haven’t tried the BG yet, but I look forward to doing so whenever I motivate myself to get some PvP gear.
Minor note: In AB, can’t you see 4 nodes from the LM in AB (Stabs, LM, BS, and Farm)? I used to always perch up there and play recon. The fact that you can slow fall to BS if needed only makes the LM cliffs even more important as a defensive feature.
I thought I’d responded to this question, but I obviously failed there. Sorry about that!
I think I meant that from any one spot you can only see 3 bases – you have to move from one side of the LM to the other to see the ST and FM flags. That might be my view distance setting, though.
But then I tested this out, and there is a spot you can see 4 flags in AB – right out the gates of Trollbane Hall. So… Whoops? 🙂
Just found your blog. Thanks for sharing your thoughts and ideas on the game. I’ve been playing a year, and still consider myself a noob in a lot of ways. I’m enjoying pvp more lately, and am glad to have someone’s thoughts and ideas to read!
Pingback: The 7 ‘P’s of PvP « Green Bar Spec
Cyn, you always provide such a great analysis of the fights.
I am ashamed to admit I hadn’t been in a BfG until just last night. Lately, I’ve been wanting to PvP more, and it popped.
It was very fun and fast-paced. Now to get back in there, with a semblance of knowing what I’m doing. 😉
Keep up the great work! I love your writing.
Thanks! I still like BfG; it’s probably the best of the Cataclysm bgs. It’s different enough from AB that it’s not in direct competition with it (unlike Twin Peaks/Warsong Gulch.)
BG healing keeps you on your toes, doesn’t it?