Category Archives: Battleground Strategies

How To Win Tol Barad

Let us not mince words; Tol Barad is a brutal battleground. It’s not just that the fights are intense – they are – and it’s not just that it heavily favors the defense – it does. No, Tol Barad’s brutality is that it can and will break your faction’s spirit.

We know that attacking Tol Barad is difficult. Truly difficult. The odds are against your assault team. You need more leadership, more communication, and more willpower to take this island than any other PvP objective in the game. Taking Tol Barad is really hard. Keeping it is hard, too.

The obstacles in our way are not trivial, but nor will they stop us. Why do we try to become Kingslayers or reach the gold cap? Why do we chase Insane titles or try for achievements at absurdly low levels?

We do them because they focus our attention, sharpen our effort, and make us better players. We do these things not because they are easy, but rather because they are hard.

We choose to win Tol Barad.

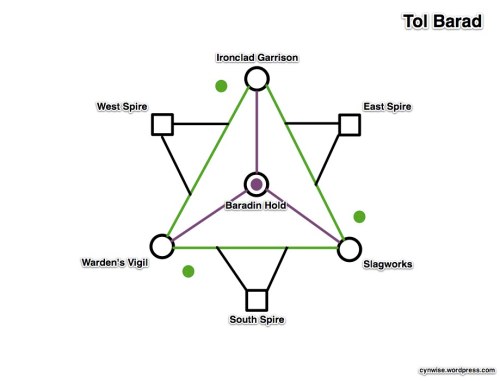
Above is the logical map of the Tol Barad battleground. The objectives for each team are relatively straightforward.

  • Attackers: Control all three bases (ICG, WV, Slag) at the same time before time runs out.
  • Defenders: Prevent this from happening.

Tol Barad is a battleground of motion and flow. A base is yours when you have more people inside its walls for longer than the opponent. Controlling bases is not about stealth or individual heroics, of elite groups going to capture flags. Defensive control is achieved by letting your troops flow like water from one objective to the next, of overwhelming each node with volume. Offensive control is gained through striking quickly at the right time to disrupt the defensive flow, of seizing the initiative, and of timing the capture of bases just right.

To understand Tol Barad, you must understand how troops will flow. Your troops, your opponent’s troops; in life, and in death. You have to understand both the terrain and the resurrection vectors of where you fight.

If you stand your ground, stubbornly holding onto one node above the others, the battle will flow around you and wear you down until you lose. If you scatter like the wind across the map, you will not have the focus to take any base; disperse, and you will lose.

At any individual base, the attackers have the advantage over time. Attackers who die will respawn close to the base every 30 seconds, about 5 seconds away from reentering the base. Defenders who die will rez back in Baradin Hold, about 15 seconds away from the base.
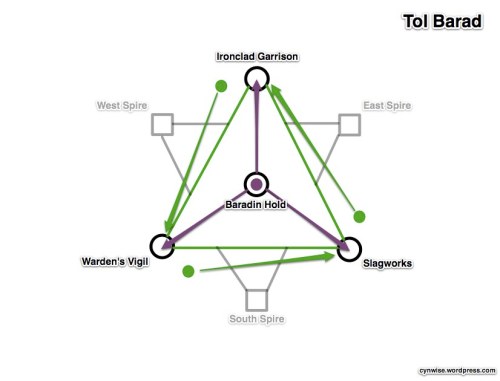
As a battleground as a whole, however, the defenders have the advantage over time. Defenders who die will respawn 15 seconds away from any given base (the purple lines), allowing them easy access from node to node. Attackers are forced to go around the triangle (the green lines), which takes 35 seconds to go from the front gate of one node to the front gate of another node.  If Attackers die and go counterclockwise around the map, the time is reduced to about 25-28 seconds.  If they go clockwise, it is increased to almost 45 seconds per move.

The key to winning Tol Barad is understanding the tension between these two fundamental truths of the battleground.

Defenders need to:

  • Move as a cohesive unit to establish numeric superiority at a single location.
  • Flow troops away from that location when it is attacked to strengthen the next location.
  • Delay the attackers as long as possible at each node without reinforcing it.

Attackers need to:

  • Move as 2-3 cohesive units to establish numeric superiority at each base.
  • Flow troops away from a winning battle to counter the flow of the defense.
  • Delay the defenders when they are not at a node; distract and scatter them so they cannot congregate.

If the Defenders can stay together and flow from base to base, they will win.

If the Attackers can disrupt the Defender’s flow and scatter them, while not themselves dispersing, they will win.

DEFENDING TOL BARAD: FLOW LIKE WATER

Tol Barad is heavily weighted towards defense. That doesn’t mean that you don’t have to try on defense, but rather that if you put forth the same effort as the offense, you’ll likely still win. Nothing in life or PvP is guaranteed. This game doesn’t hand you Tol Barad just for showing up.

The simplest form of the strategy is:

  • Begin by defending a single base with every person on your team. Everyone on your side goes to that one point until it is attacked.
  • When your troops die, you do not reinforce your current base; start moving everyone to the next base instead. Chose the emptiest base to move into. While clockwise motion is slightly more advantageous than counterclockwise (the latter favors the attackers), to you all bases are equal. You can, and should go, counterclockwise if necessary.

That’s it. Flow around the triangle to where your enemy is not, and you will win.

The only people who should not be in the main group are your reconnaissance units: leave one stealther at each base with strict orders to NOT ENGAGE. They are there to count heads, report enemy movements, and nothing more.

You do not need to stay at one base on defense. You can move around the triangle and overwhelm the forces holding each base. As long as you attack with more people – hopefully your entire group – then you will take the base back under your control quickly.

Pay attention to where your dead teammates should be going next. Give clear instructions to dead players so that every 30 seconds you can send a new wave of troops to the correct destination.

  • If you are overwhelming a base, have the rezzers rejoin the main force.
  • If you are encountering stiff resistance at a base, have the rezzers move against an empty one.

If you are in the graveyard and are not sure where you should go next, ask.

The Defenders should never actively assault 3 bases at the same time. If you leave token forces at 1 or 2 bases, but strongly fortify a 3rd, you cannot be beaten when the weak sites are lost. If you divide your forces equally between all bases, you’ll lose. But you can certainly keep moving forces around and prevent the attackers from capturing any bases – it’s actually quite trivial to shift your forces to make the battleground a 0/3 match if your troops are good at assaulting positions.

Sometimes, you will find yourself down 2/3 bases. The temptation will be to go to the empty base, to reinforce your last stronghold. Resist.

Open your map, and look where all your people are. If they’re already at the last base, then go there. If they’re not, go to where your troops are. The more troops you throw at a different base, the faster you can take it. If the empty base is going down, take a different one.

The attackers want you to overcommit to the wrong base, to confuse you, to scatter your forces.

You have to act like a single unit on defense. If everyone is going to WV, everyone goes to WV and does not stop. No exceptions.

  • If you lose focus, you will lose.
  • If you lose discipline, you will lose.
  • If you stop outside a base, you will lose.
  • If you are alone on defense, you are doing it wrong.
  • If all you do is sit in a base and wait for 25 minutes, then you will win.

Your defense must flow. It must be unified. It must be reactive.

If you do those things, you will win.

ATTACKING TOL BARAD: JUGGLING FIRE

Assaulting Tol Barad is hard. It’s quite possibly the hardest PvP objective in the game right now. It is easy to give up, to complain it is too hard, to try to cheat the system. This is a place where despair is the greatest enemy your team will face. You can play very well and still lose. You can win every single engagement and still lose the battleground.

You cannot give up.

Taking Tol Barad requires attackers to win the last base faster than they lose another. You must take the final objective quickly, and your defenders must concentrate on holding the falling base tenaciously, to give you as much time as possible to succeed.

This sounds like a simple truism, but in practice it is quite complex. It is akin to describing juggling or riding a bike with words; how hard could it be to keep three objects in the air at the same time, or of falling in two directions at once while pushing yourself forward? These skills are easy to describe, but difficult to achieve the first time.

You will need to win one base faster than you lose another. That’s it. That means:

  • You must strike hard and fast as a group. You must surprise the defense and subject nodes to massive attacks, not slow sieges. Trickling troops into a base allows the defense time to adapt and flow; you cannot allow this. It is better to pull back and mass your forces outside a base rather than send individuals to be slaughtered. Waiting the extra 30-60 seconds for a larger group is almost always worth it.
  • You must get as many people into a base as possible on the first try. Do not get caught outside, or allow yourself to be drawn out. Do not give chase to defenders fleeing en masse; stay and cap the base quickly while adjusting your forces elsewhere for the incoming assault.
  • When defending the base you’re going to lose, stay alive as long as you can. Run away. Go to the back side, don’t stand in front. Use the features of the base to give you line of sight advantages. The longer you survive, the more time you have given your teammates to take the final base. Standing at the front gate and getting mowed down by the zerg might be noble and brave, but it serves no purpose aside from losing the base quicker. Every person in the base slows down the timer. Stay alive.
  • Spies are not just for the defense; taking Tol Barad requires knowing where the defenders are going, where they are strong, where they are weak. Defensive behavior is somewhat easier to predict than offense, so spies placed by the central graveyard can indicate where the next resurrection wave is going, while those near the front of the bases can see the approaching troops.

Speed is both your friend and your enemy. You can beat the Defenders back to any given node, but you cannot beat the Defenders to the next node. You cannot circle around counterclockwise in one large group and expect to win. You have to make them go where you want them to go, lead them astray, scatter them, break their zerg. And to do that, sometimes you will have to go fast, and sometimes you have to go slow.

When you hold no bases, taking the first one is your priority. You can feint against all three bases equally to determine where the defense is weak and then shift your forces to taking that base, or pressure on three fronts and see which one you can grind out. The former option gives you a choice to go against a strong target instead of a weak one, which can scatter the defense as they determine where to go next. The latter can be used to gauge enemy strength, as well as your own.

Once you have the first base, you’ve given the defenders a target, which gives you some control over their actions. Be willing to sacrifice that first base if you can take the other two. If the defense is a unified zerg and comes after it, abandon it, split your forces, and take the other two bases. Get out before you are trapped. If the defense is split with some defending and some attacking, split your forces in return and overwhelm their defenses.

The only time you should commit to holding a base is when you are buying your team time to capture other bases. This is one of the paradoxes of attacking Tol Barad; your nominal advantage is in taking a base and keeping it, but since you need to diffuse your forces to hold the captured bases, staying to hold a base can be detrimental to winning the battle. Do not let your forces get trapped defending a base they cannot retake. Move to somewhere useful instead.

Skilled defenders will take advantage of player’s stubbornness and unwillingness to abandon a task to trap your forces in a location they have no hope of taking. If you have 1/3 of your force at ICG, fighting 1/3 of their force but not taking it, or taking it very slowly? The rest of the battleground is still even, but ICG is out of play (and not yours.)

If you are slowly taking bases while attacking Tol Barad, you’re doing it wrong. You have 2 minutes, maybe 3, to take each base. If you can’t, then you need to fall back, regroup, and try again. Try the same place, or a different base – but don’t keep running in from the graveyard to die.

You may need to reset your offensive several times throughout the battle. That’s fine. Don’t panic, maintain the spirits of your team when you fall back to 0/3, and start over again. Resetting the fight is necessary so that your offense doesn’t get scattered. You have to be mindful of falling into several traps:

  • Are you chasing the zerg around in a circle?
  • Are you hammering on all three nodes with no success at any of them?
  • Are the majority of your forces at a single node, yet are not taking it?
  • Are your forces all over the map, with very small groups going from place to place?

If so, you need to stop and reset your offense. You cannot win the battle unless you do.

The key to offense is striking hard while juggling fire. You want to strike hard so the defense doesn’t have time to shift and flow around you. You are trying to achieve victory during a fleeting moment in the battle – when the defenders have finally grown weak in their last base, but have not yet taken another one. You need to toss that last torch into the air just before the next one comes down.

Attitude is important. Spirit might (or might not) be useless on your gear, but it’s essential to winning Tol Barad. People all over will have to step up and be leaders. You will have to vocally combat negative feelings and sagging morale when things go against you. Do not let the complainers demoralize your side. You will lose, but when you lose, you will not give up.

You cannot expect to win. You are not entitled to win. The game does not owe you a win. Repeat that several times until it sinks in. Get rid of the idea that you should win. Those thoughts are immaterial to the task at hand. You can play excellently and still lose, just like real life. Get over it. Try harder next time. Grow stronger! The game doesn’t owe you a win.

You must work as a team. Offense requires more coordination than defense. If people on your faction are not participating – afking, gathering, etc. – call them on it. If people are not following with the group – if they’re randomly running around the map – call them on it. If they are dropping raid (and therefore splitting your groups up) – call them on it. Post the afkers in the forums, if you have to, to try to shame them into helping out.

Taking Tol Barad away from the defenders is hard. Really hard. No one is arguing that now.

But that is why we do it.

TAKING A BASE IN TOL BARAD

The best strategy in the world cannot win the battle for you if your troops cannot execute their mission on the ground. Great leadership and communication is all for naught if you cannot do the one thing that Tol Barad absolutely requires: take control of a base away from the opposing team.

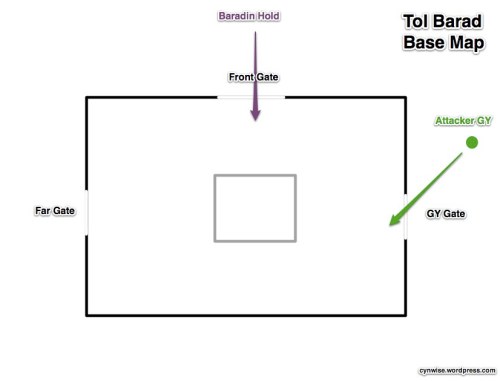
Each base has unique interior features, but the layout is basically the same:

While I can’t comment on what the builders of these bases were thinking, having three gates – maybe they were taking notes from the High Clerist’s Tower – the three gates dominate your strategy in each base, and you can use various tactics to turn them to your advantage.

Let’s look at how Defenders can use the proximity of the Attacker’s GY against them.
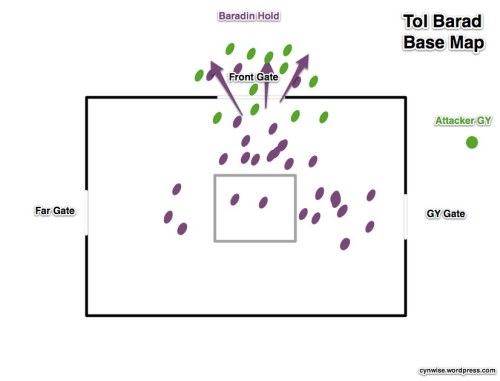
The above map depicts the attackers trying to come in through the front gate. The defense is spread throughout the base but sends some strong DPS classes out to meet the rush, maintaining line of sight with the healers. By stunning, slowing, or CCing the incoming attack outside of the base, the attacking players never count towards moving the slider bar. The few attackers who get inside are isolated from their teammates, and while they can cause damage, the attacks are unfocused, unfiltered. At best you might be able to get a few healers down before the attack starts to falter.

The second stage of this defense is to separate the initial assault from the rez waves that will spawn. The attack has been split in two, with a strong central defense between the two.

The assault might have a chance, except that the defense is doing the right thing again; forcing the attackers to fight outside the base by engaging them there. Over time, the attackers might be able to mount a good push through the GY gate, but it’s going to take some time – time which favors the defenders.

  • When attacking a base, get inside.
  • When defending a base, draw the attackers outside.

Let’s look at a different way this base assault could have gone.

By feinting to the front with a decoy, the attackers are able to draw some of the defenders away and out, while drawing everyone’s attention forward, towards the front gate, while they mass at the far gate for a massed charge inside the base.

While it’s tempting to go after the main group of defenders, it’s better to instead establish a presence in the rear of the base. Get everyone inside before the shooting starts, that way you can’t be drawn outside. It also forces the defenders to shift their forces, like so:

Now, while the attackers are still spit, they’ve changed the position of the defenders so that they will have to move away from the GY gate to fight one force, while the rez waves hit them from behind.

The drawback to this kind of assault – besides needing coordination and planning – is that the attackers do not have any way to intercept the defensive rez waves, coming from Baradin Hold. This usually shouldn’t be an issue except during the final battle.

Now let’s look at it from the attackers holding the base.
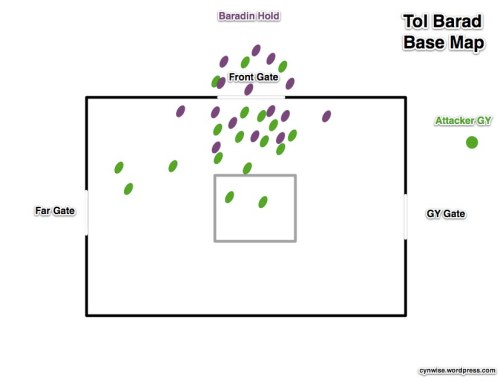
In many ways, this is a similar layout to the previous example, but the roles are reversed and the sides are switched. It is generally impractical for Defenders to attack from either of the side gates at first, as the front gate is the closest to Baradin Hold’s graveyard. Instead of defending towards the GY gate, attackers should shift their forces to cover an attack from the far gate instead, as their own rez waves will be there later on to intercept the incoming attackers (and keep them out of the base).

What’s interesting is that the same rules apply – if you want to attack a base, do the unexpected:

Charge the flanks instead of the front, go through the graveyard, and hit the base’s defenders from behind. Reinforcements can then flow in through the front gate, and you turn around and establish a new front at the graveyard gate.

The supposed advantage of the attacker’s graveyard is only one in terms of time: the attacking force will return to battle faster than defenders. But because that advantage of time requires them to use a set path, it can be turned against them.

This set path is why attackers need to take a base quickly. Drawn out conflicts mean that the majority of the attacker’s force will be coming in from the graveyard, where they can be stopped and overwhelmed.

To sum up:

  • Causing distractions at the front gate is good. Assaulting it in force is not.
  • Attacking in force on the side away from your graveyard lets you establish better positioning within the base. Within the base means you count.
  • Defending a base requires you to meet the opponent outside the base and keep them there. Melee DPS should go out to meet them, ranged DPS should stop them at a distance, and healers should bring up the rear.
  • If you get stopped outside the base, getting inside is your priority.

One final word about taking bases: sometimes, your team can’t do it. They may outnumber the defenders but are outgeared; they may be primarily clad in PvE gear against PvP gear; they may just not be very good at PvP. It happens.

What you need to do when your team is outmatched and can’t win the 1:1 matchups is try to reset. Move those people to defense on another node, or have them join a larger assault. Reset the fight and pull them out. You don’t have any real control over who does and doesn’t get into Tol Barad, but you can move them around as needed. If ICG is stuck, have everyone at ICG go to WV – and have Slags go to ICG.

Taking that final base on offense is going to require your best effort. If the team sent in to do the job can’t do it, shift quickly and try something different. You don’t want to get stuck having the same people futilely grind against a base for 15 minutes when it’s the last one to fall.

If you’re defense, though, that suits you just fine.

GENERAL TACTICS

As opposed to strategy, there are some tactical things you can do to help your success in Tol Barad. These apply to both attackers and defenders alike.

Form your raid groups before the battle and assign tasks. Tol Barad can be taken very quickly by a coordinated offense that starts immediately towards their goals. Remember forming the Wintergrasp raids before each battle? Well, there is no reason you shouldn’t be doing that right now. This is something the offense should certainly do, as it gives them the ability to try for a quick win when the battle starts. Send half to Slag and half to WV, and let the stragglers get ICG, and the game is over.

Use guilds to help coordinate team assignments. A guild should be a unit that is already used to working together, and it’s easier to dispatch a guild to do a task than try to assign arbitrary units. Telling the Knights Who Say Ni to go reinforce Slags is more efficient than saying “we need some more over here at Slags!”

Get your side to use PvP addons. Addons like Healers Have To Die, when used by a lot of your team, can help focus your attacks on the primary targets (sorry, healers) and take them down first. Talk up the utility of your favorite PvP addon in Tol Barad general chat.

Use magic to help you move. I’m not just talking about Life Grip (back in base, silly!), Death Grip (out of the base!), and various forms of knockback to bounce people out of the base. I’m also not talking about various creative uses of your warlock teleport circle, or Blink. No, I’m also talking about using the demon TIVO itself – Ritual of Summoning – to move your forces around. Especially in coordination with guilds and preformed raids, this can help move your healers around to get them to the next hotspot before the invasion happens.

You have spies; use them. You should be using spies; stealthed units with the ability to report what they see. Spies in each base can give you troop counts and positioning, as well as join in to take out scouts or healers when your assault comes. Defenders should park someone in each base; attackers might be able to get away with stationing someone in Baradin Hold, but it’s better if the bases are monitored, too.

LEARN FROM YOUR MISTAKES

I spend a lot of time in Tol Barad looking at the above map. What’s going on? Why are we winning? Why are we losing? Where do we need people? Where are we strong, where are we weak?

This is a hard battleground to win as the attackers. The defenders have a somewhat simpler strategy to follow, one that is also more forgiving of individual errors and weaknesses. Go here, now go here. But just because it’s simple for the defenders and complex for the attackers doesn’t mean that the battleground is responsible for your particular loss. Did you have a plan? Did you execute on that plan? Were you able to take the bases you needed to take? Did you stay together, or did you get scattered?

In a normal, balanced battleground, a loss comes down to one team playing better than the other. Maybe you played poorly, maybe they played well – but whatever it was, one team played better than the other.

Tol Barad is different. Tol Barad is biased, heavily, towards the defenders. Winning as an attacker should feel big, because it is big. But it’s not going to happen every time.

Sometimes, you will do everything right and still lose Tol Barad. That’s okay. Don’t beat yourself, or your teammates, up about it. Get over it, learn what you can from it, and try again in two hours.

WINNING AND LOSING

You’re not going to win Tol Barad all the time.

I think that’s the thing that I have learned the most over the last few weeks in Tol Barad – it’s not a no-win situation. This is not the Kobyashi Maru test, a true scenario with no possible way to win.

It’s just hard. Really hard at times, but hard.

At some point, someone on your server will do it. They’ll flip Tol Barad to the other faction. Perhaps they lead a brilliant assault. Perhaps they queue in the late night hours and stay up until the morning making sure it doesn’t switch hands.

Tol Barad is neither fair nor balanced. It is a rock that you can dash your faction against and lose repeatedly. It is a place you can hold for a week and then wonder how you lost in a matter of minutes.

It is not always fun. It is not always rewarding. It is a hard battleground.

But you can win it.

Good luck.

30 Comments

Filed under Battleground Strategies, Cynwise's Battlefield Manual

The Battle For Gilneas

The Battle for Gilneas is one of three new PvP battlegrounds introduced in Cataclysm. It is a relatively straightforward 10v10 resource match between the Horde and Alliance, set in the wonderfully gloomy atmosphere of Gilneas. There are three nodes to control – the Lighthouse (LH), Waterworks (WW), and Mine – and each node generates resources for your side. Each node has a flag you need to click and channel for a few seconds to capture. The more nodes you control, the faster your team gains resources. First team to 2000 resources wins.

If this sounds like a 10-man, 3-node Arathi Basin, well, that’s because it is. This is a half-court AB, designed to be fast and engaging.

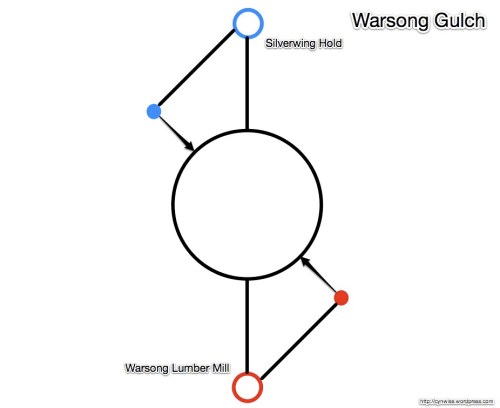
Let’s take a look at the topology of the battleground.

If you haven’t seen one of my topological maps before, I go into a lot more detail in their original post, but the general idea is to only present the logical flow between objectives. Large circles are capturable nodes, small filled in circles are graveyards, and colored circles are graveyards which do not change control. Squares are important locations, but non-capturable. Terrain is pretty much ignored.

Looking at the map, calling BfG “a half-court AB” isn’t really a joke – it’s the AB map cut in half, with the Blacksmith removed. The three nodes are arranged in a rough triangle, with the Overlook in the center. Capture two of the nodes and hold them to win. Any two will do.

The Overlook is one of the more interesting elements of the Battle for Gilneas. It has no flag, no resources – but you can see every single node from it. This is something that sets BfG apart from AB – the ability to actually see every flag from a single point. In AB, at least two nodes are always hidden from sight from the absolute best vantage points (Farm, Lumber Mill, Stables). Not so from the Overlook. There is a tactical advantage to holding this spot, though it comes at the cost of not fighting near a flag.

The flow of this battleground is, thankfully, very linear. You are fighting within a triangle to capture nodes at each point. In the center is a vantage point that lets you see what is going on, but ultimately you will shift your team around the triangle.

The terrain in this battleground is really well done. While the flow of the battle is deceptively simple, the terrain is varied and forces you to become acquainted with the numerous choke points and obstacles between each node. A river cuts through the southern part of the map, encircling the Waterworks, but is not a huge impediment. The area around the Overlook is full of gullies and ridges, perfect for funneling your opponents into traps and area of effect spells.

Like with any other battleground, I encourage you to just run around on the map and see what it’s like. You can experience it without the thrill of combat using the new War Games feature.

WINNING THE BATTLE FOR GILNEAS

Fight at the flag!

I am absolutely serious about this: you want to win, fight at the flag.

I am amazed at how many people I see who have apparently forgotten how to fight at the flag in my short time in this battleground. The attackers let themselves get pushed away, intercepted before they ever come close to capping the node. The defenders let themselves get lured away down the road to the Overlook, until half the team is fighting over a piece of land that only has intelligence value, while the node gets capped behind them.

That kind of behavior doesn’t fly in Arathi Basin, and it won’t fly in Gilneas, either.

Get to know the terrain. If you’re attacking, use the buildings around the various nodes to mask your approach. Approaching from the Water Works seems to have more cover than the Overlook. Get between the flag and the graveyard and force the defense away from the flag. Make it so the rezzing defenders have to go through you to get back to the node.

Defense, intercept them away from the flag, but then fall back and do not chase. Don’t get caught up in the thrill of it all and let them sneak around to cap the undefended node.

Reinforcements arrive quickly in BfG, so call out incomings early, often, and as accurately as you can.

If this all sounds like the strategy for Arathi Basin, well, that’s because it’s the same strategy. First to 2000 points wins, after all! The smaller team and map size makes for some pretty intense fights around the flags, with everyone having to contribute to succeed. But it’s basically the same game.

I like the Battle for Gilneas. It’s taken many of the good qualities of Arathi Basin and Warsong Gulch and combined them into a fun game. It fills out the 10v10 bracket nicely, a nice addition to the smaller format that formerly was limited to Warsong Gulch. The rules are familiar, but the map is all different, which makes for an interesting and fun experience.

Just remember – fight at the flag!

25 Comments

Filed under Battleground Strategies, Cynwise's Battlefield Manual

Tol Barad and the Ghosts of Wintergrasp

Wintergrasp was one of the great success stories of Wrath – a PvP zone with epic battles between hundreds of opposing players. Hundreds. The Battle for Wintergrasp unified factions on servers like no event before or since. The call would go out in Dalaran that the battle was starting. “Please start a new raid, this one is full!” people would cry out in the prep rooms, and if you were smart, you used addons to create those raids. Every two and a half hours servers would come together to beat the crap out of each other on the frozen fields of Wintergrasp.

And it was glorious.

This is not to say Wintergrasp was not without its problems in the beginning – do you remember driving siege engines through the walls? – but it was an immediate success on a scale that Blizzard was not prepared to handle. Wintergrasp caused Northrend servers to crawl during good battles, and crash during the really big ones. The lag during larger battles never really went away, even when WG went to an instanced battleground.

Wintergrasp was an immediate success, and somewhat unexpectedly, it stayed successful for the entirety of Wrath of the Lich King. Tenacity and the self-righting mechanics allowed outnumbered factions to compete. The map is interesting and requires players to make choices about what to attack and what to defend. The southern towers required attackers to make choices about how much strength to commit to offense versus defending the towers, while giving the defenders a reason to leave the safety of the Keep. The Keep itself is large enough to prevent a concentrated buildup of defensive forces, requiring defenders to make positioning choices.

But most important of all, Wintergrasp gave players an incentive to participate.

There’s a fundamental difference between PvE and PvP encounters: motivation. A PvE encounter has to offer a reward for the players to make them want to do it. Justice Points, badges, gear, achievements – whatever it is – all these things are offered as incentives for players to engage in, and defeat, the PvE encounter. In PvP, however, you have to motivate both sides to play, winners and losers alike.

Think of it as having to pay raid bosses to show up to be loot pinatas. You can’t have PvP without the other players, and they have to have a reason to show up.

Wintergrasp did this extremely well. Not only did it reward victory extremely well – a zone-wide XP buff, Stone Keepers Shards for heirlooms, and tokens that let you get great gear – it rewarded failure, too. People wanted to win, but even if they lost, they still got both honor and tokens. Victory was rewarded well, but failure wasn’t a complete waste of time.

This brings us to Tol Barad, Cataclysm’s PvP centerpiece.

TOL BARAD

Tol Barad is, ultimately, a simple battleground. It’s smaller than Wintergrasp, with somewhat simpler objectives. Looking at it topologically:

The goal is simple. The attackers (who use the green graveyards) need to take and hold the three outer nodes (Warden’s Vigil, Slagworks, and Ironclad Garrison), while the defenders (who use the purple one in the center) need to prevent this. The 3 towers (Spires) can be destroyed to add time to the clock, but they’re not really important.

To capture one of the outer nodes, you need to have more players in that area. You don’t have to be winning, you just have to have more players around it. The more players you have, the faster the bar swings to your side.

Sounds simple, right?

There’s only one problem: Tol Barad is broken. Gevlon warned folks 10 days ago to stay away until it’s fixed. Mat McCurley over at WoW Insider has an excellent analysis of the six problems affecting Tol Barad, as well as solutions to fixing each one of them. Both of these posts are worth your time to read, especially Mat’s WI post.

Look at that map again. The defensive strategy is simple – send all of your forces along a purple line to the node where the attackers are weakest. The attackers, in turn, will have to keep circling around on the green lines, trying to outnumber the defenders at any one point. But the defenders will always be able to get to a new node first. The attackers have the tactical advantage at the node due to the nearby graveyard, but the defenders have the strategic advantage for the battle.

“I don’t believe in no-win scenarios,” a famous starship captain once said, and I don’t either. Attackers can win Tol Barad, in theory. It’s just really, really, really hard. It involves subterfuge, deceit, spying, and being as underhanded as you can manage, but you can do it.

But even though it’s possible, it’s just not worth it.

THE GHOSTS OF WINTERGRASP

I remember looking over the gear I could get from Tol Barad and wondering where all the PvP equipment was. I mean, for a place that you have to fight tooth and nail for, why would I want to even bother? Some daily quests? The incentives are all wrong. I would rather spend my time in battlegrounds grinding out Honor and Conquest points than fighting for Tol Barad.

I should not be ambivalent that the opposite faction controls Tol Barad all the time on my server. But I am. What is in it for me that I can’t get elsewhere?

Wintergrasp hit the rewards perfectly. Not only did you get access to a raid boss for winning, but you got heirlooms for the PvE crowd and good offset pieces for the PvPers. And the losers had a reason to participate – even if you lost, you edged closer to that gear, and eventually you’d win and be able to buy it.

Tol Barad, frankly, doesn’t offer me enough to make it worth the effort.

I was having a good night in the battlegrounds earlier this week, so on a lark, I queued up for Wintergrasp again, and joined into a 5v5 running battle across the entire zone. Wintergrasp doesn’t really work as a 5v5 Arena, but I saw a few familiar faces in there (mostly on the other side) and enjoyed securing workshops, building catapults (hey, it’s all we could afford), and trying to survive long enough to get some damage done on the walls. It was fun, but not very good. Small WGs favor the defenders, heavily.

But I knew that if we put enough people in, on both sides, it would have been a fair fight. You may not be able to do as much with only 5-10 people per side in Wintergrasp, but you certainly could take the keep with a little bit of work.

Not so for Tol Barad. The strategic problems are such that if you have 1 person, or 80, the results will be the same.

I love the idea of Tol Barad. I want to see it flourish, to thrive, to be the reason I log in at specific times each day. I want it to put Wintergrasp to shame, because Wintergrasp’s time is gone.

But for now, Tol Barad is just a pale ghost of Wintergrasp.

30 Comments

Filed under Battleground Strategies, Cynwise's Battlefield Manual

A Different Kind of Battleground Map

In 1931, Harry Beck created the first version of his revolutionary map of the London Underground. Instead of accurately overlaying the train routes over a geographic map of London, Beck presented the topology of the Tube, divorcing it from the complicated, messy reality of the physical world and giving the logical connections between stations instead. This innovation has been rightly copied on metro transit maps throughout the world — presenting the flow of bus routes or subway systems is much more useful to a traveler trying to find the right line and stop than knowing where those lines and stops are in relation to the real world.

Topology is different from topography. Topography deals with the shape of the land, and is often seen in geographic maps. Topology deals with spatial flow. A topographic map will show elevation and surface structures; a topological map will show how different points relate to each other.

Practitioners of engineering, both Gnomish and Goblin, will recognize this type of map in circuit and network diagrams. The physical layout of the network is not as important to understanding how it works as the topology. Engineers need to know what connects to what when troubleshooting a design problem, not neccessarily where those things are located on a circuit board or network. Often elements of the network can be completely glossed over because the details are irrelevant to the discussion at hand — the concept of the Internet as “the cloud” comes from this reduction.

I’m used to looking at geographic maps for battlegrounds. The in-game maps show terrain, the location of objectives and obstacles, and your position with accurate scaling. These maps accurately reflect the battlefield and are useful tools.  Every twist of every path is accurately documented.

But there are times that these maps fail us. They present a lot of information you don’t need when thinking about strategy. They don’t convey the objectives of the battleground, or the flow from goal to goal. They aren’t good tools for new players to learn from, either — much like a geographic metro transit map, there’s a steep learning curve to know where you are and where you go next.

In talking with Nibuca on the Twisted Nether Blogcast, it occurred to me that the maps are part of the barrier to entering (and enjoying) the battlegrounds. “It’s not obvious what you’re supposed to be doing,” she said, and I agree completely. While dungeons are, for the most part, linear affairs, battlegrounds are not. The objectives are not clear when you first zone in, and — here’s the kicker — knowing where to go next is never obvious. Nearly every battleground has a symmetric map, which means there are no cues like “follow this corridor.” Battlegrounds are more complicated than that.

Using the London Tube map as an inspiration, I think looking at the battleground maps logically and topologically, instead of geographically, can help overcome this barrier to entry. And with rated battlegrounds coming in Cataclysm, more and more guilds are going to be looking at setting up strategies and teaching people to fight in these instances. Hopefully these maps will prove useful for both groups.

Normally, I present maps to illustrate a strategy.  Here, I’m just presenting maps to give you a different perspective on each battleground.  I expect you’ll see me use them again in later strategy posts.

READING THE MAPS

I’ve tried to keep each map simple, sometimes absurdly so. This is deliberate. There are complexities to each battleground that are confusing to the new player, and as such have been avoided. There’s a vast amount of tactical knowledge that you pick up running a battleground that can completely influence the fight, but the purpose of a topological map is to point out the flow, not the terrain.

The legend for these maps is:

  • Large circle: an objective players can capture.
  • Small black dot: a graveyard players can capture.
  • Dot within a circle: an objective with an associated graveyard. Control of one implies control of the other.
  • Red node: Starts under the control of the Horde.
  • Blue node: Starts under the control of the Alliance.
  • Colored dot: A graveyard that cannot be captured. Usually, but not always, a spawn point.
  • Solid line: bidirectional path between nodes.
  • Arrow: one-way path. Usually involves jumping.
  • Square: Resource that can’t be captured, but can be used by one side or another.

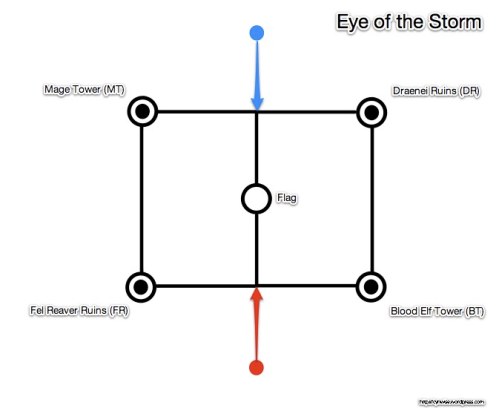
Let’s take a look at the simplest battleground map of all, the Eye of the Storm.

EYE OF THE STORM

There are five nodes you can control in Eye of the Storm: the 4 bases and the flag. The four bases at each corner have graveyards associated with them, so they have the bulls-eye symbol associated with them. Each node has only two approaches.

The flag sits in the middle of the battleground, again with only two ways to access it. There is no graveyard associated with controlling this objective — instead, it’s something you have to capture and then return to a controlled base.

Each side starts with one graveyard that cannot be captured; these are the spawn points and cannot be captured by the other side. Players must jump down from the floating rocks to reach the main battleground, represented by the colored arrows.

There isn’t any way to circumvent the routes shown here: this battleground floats in the Twisting Nether and you would need to fly in order to traverse it. So control of routes is absolute.

Make sense?

Next, let’s look at a slightly more complicated map: Arathi Basin.

ARATHI BASIN

Arathi Basin has 5 nodes, each with an associated graveyard.  These are the places where you really should fight at the flag.  There are two spawn points that cannot be captured by the other side, but can be accessed and camped, at either end of the map.

The orientation of the geographic map sets the flow of the map along a NW/SE axis, which can be confusing. The bases are set out with one close to your starting point, one far away, and three in the middle.

Unlike Eye of the Storm’s map, it is possible to move outside of the lines in this map, though it almost always involves either going very slowly, falling off a cliff, or both. The Lumber Mill is on a cliff, so characters who can slow fall, levitate, or parachute can go directly to the Blacksmith. Same going from the Blacksmith to the Gold Mine. Going from the Farm or Stables to Blacksmith requires swimming or water walking.

All of those are ‘difficult’ paths between nodes, so I omitted them.  Chalk them up to “quirks of the terrain.”

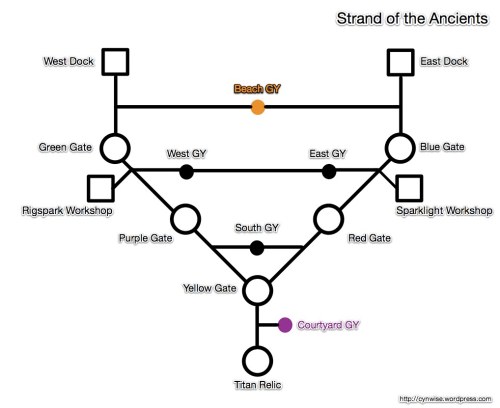
STRAND OF THE ANCIENTS

Strand of the Ancients is interesting because it’s the only half-court battleground in the game. One team fights to the Titan Relic while the other defends, and then everyone switches sides. So the flow of the battle always goes from North to South, from the beach to the relic.

Strand has a lot of little touches that make it interesting. Teams start in different places (landing ships for offense, south GY for defense) than their fallback graveyards (beach and courtyard). Control of the graveyards gives control of resources, not the other way around.

Seeing Strand like this really highlights the importance of graveyard control in this fight for both offense and defense. More on that in a later post.

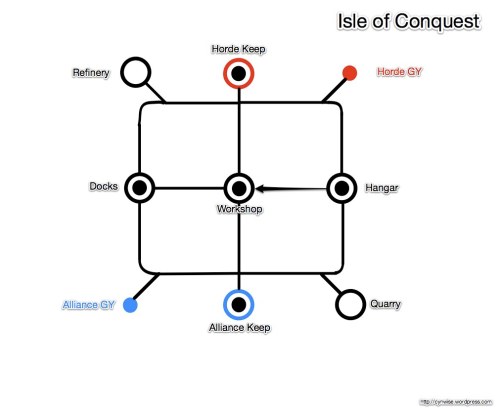
ISLE OF CONQUEST

The Isle of Conquest has a deceptively simple flow. This is a battleground where terrain, elevation and lines-of-sight matter. The different abilities and vehicles each node grants your team make this a far different place than Arathi Basin, where all nodes have equal resource value. You can win IoC with control of a single node, for example, something you cannot do in Arathi Basin.

That said, IoC has a typical circular map.  The three nodes in the center force you to divide your forces to focus upon the objectives.  In this aspect it’s very much unlike the other 40-man battleground, Alterac Valley, which is a linear map that doesn’t require tremendous coordination to run.  Let’s look at AV next.

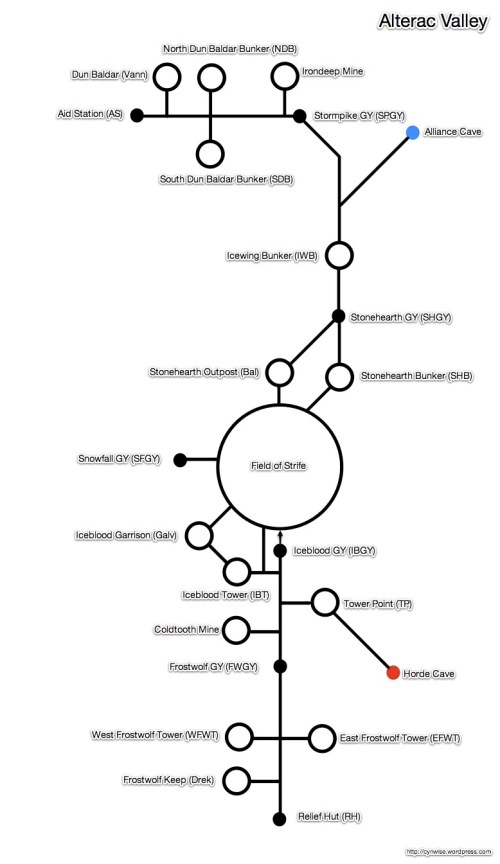
ALTERAC VALLEY

Alterac Valley is a monster of a map no matter how you look at it: there are 24 points of interest spread out in a long North/South battleground. Because the graveyards are separate objectives, graveyard control is its own game within AV.  Knowing where to station defenders is paramount as your forces are sent all over the map.

However, despite the complexity of content, the flow of Alterac Valley is relatively straightforward.  This is not a circular map like EotS, AB, or IoC — it’s linear.  Alliance rides South while Horde rides North.  Teams can establish chokepoints and restrict the enemy from moving any further up the map.  It’s a fascinating, unique battleground, and the map is no exception.

Okay, so I love Alterac Valley.  Like THAT’S a surprise.

WARSONG GULCH


Remember how I said Eye of the Storm had the simplest battleground map?

Well, despite what you see above, I still think it does.  Warsong Gulch has the simplest topology, but not the simplest terrain.  There are 4 different approaches into each base, each with strengths and weaknesses.  Learning the ins and outs of the bases is essential.  Learning the terrain of midfield is also essential. But when I look at the terrain of Eye of the Storm and compare it to Warsong Gulch, it’s a far simpler place.  There are two approaches to each base.  There are few obstacles between each.

But in terms of the goals and logical flow of Warsong Gulch, it is as simple as this map makes it.  There’s your flag, and their flag.  Everything else – ramp, tunnel, roof, balcony, midfield – is immaterial.

If there was a zen battleground, Warsong Gulch would be it.

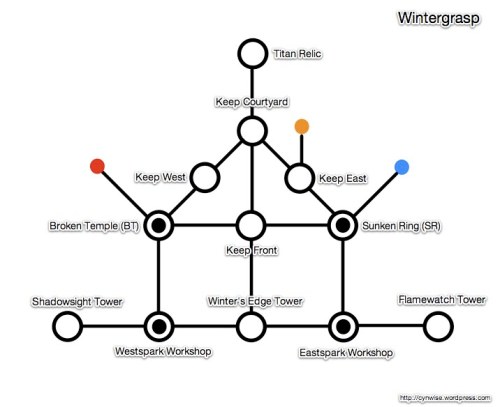
WINTERGRASP

Though it’s not a fully-instanced battleground, I’ve also made a Wintergrasp map in the same style. Wintergrasp is still relevant to many players, and the points in my Introduction to Wintergrasp still apply.

I altered the keep layout a bit to illustrate the flow of the outer ring defenses — breaking into one of the outer keep courtyard doesn’t reduce any of the others, and you have to go through at least one before getting to the inner keep.

LAST WORD

I said at the top of this post that I didn’t have a specific strategy to illustrate by presenting these maps.  That’s mostly true.  I think that looking at the logical flow of a battleground is vital to understanding the strategy behind it.  But it’s also vital to learning it and making sense of those first crazy runs across the map.

I hope you find these maps useful.

32 Comments

Filed under Battleground Strategies, Cynwise's Battlefield Manual

Healers and Battleground Roles

If you can heal, you should be healing in a battleground. That is the rule. No matter how unfair it is to the players involved, no matter the other strengths of the class or player involved, if you can heal, you should.

Forget about the awesome PvP abilities of some of these hybrid classes. Who needs Enhancement Shamans powering a node’s defense, Retribution Paladins dominating front-line combat, or Shadow Priests destroying swaths of the enemy? Never mind that Feral Druids are some of the best flag runners and node cappers in the game!  If those players want us to win they should be healing!

Do you see how silly this attitude is?

This ridiculous strawman what happens when you take an observation – healers win battlegrounds – and turn it into a prescription – everyone who can heal, should. Carried to this extreme it becomes patently absurd.

Yet, even though it is absurd, you’ll hear well-meaning people say it. I’ve probably even said it once or twice.  But the scarcity of healers is no excuse for pigeonholing players into roles they either choose not to play, or frankly aren’t very good at.

The source of the problem lies in the lack of defined roles in a battleground. You don’t select Healer, Damage, or Crowd Control when queuing for a battleground – you just show up. Random chance governs your healing team, if you get one at all. So when you look around at the class compostion of your team, you see the potential healer pool. The actual team is far smaller.

Good healers win battlegrounds. That statement carries with it a terrible burden of responsibility that no player should be saddled with, especially because it is only part of the whole truth.  I propose a new axiom: Good players win battlegrounds. Players who know how to lead, players who know how to fight, players who know how to control the enemy, and yes – players who know how to heal.

Battleground raid roles are not as simple as PvE raid roles.  The Tank-Healer-Damage trinity simply doesn’t apply to PvP, and is instead replaced by situational roles for each battleground.  Within the smallest battleground, Warsong Gulch, I can think of a dozen roles in two different configurations.  Zone coverage would be broken down into Flagroom Defense, Midfield / Offensive Support, and then Offense / Flag Carriers, each subdivided into Control, Damage, and Healing.  Or you could abandon zones and go with task-based role assignment: Flag Carrier, FC Support, Midfield Control, EFC Hunters.

However, trying to communicate these kinds of complex role assignments to a random PuG before a battle is madness.  The reason Simple Battleground Strategies work is because they present a way for your team to work together quickly, easily, and independent of raid composition.  Unfortunately, that simple way of thinking bleeds into how we consider healers and healing-capable classes because there is no refinement within them to consider the other roles a hybrid class can play in the battleground.  Good hybrid players go and perform those roles within the structure of the simple strategies anyways, but it would be nice if we started seeing more refined roles that didn’t just go “Healer / Not Healer.”

I think that the introduction of Rated Battlegrounds in Cataclysm will have a dramatic impact of how we think about our strategies.  PuGs are still going to happen, but I really expect to see more battlefield organization through guilds and general PvP alliances.  The incentive to organize is going to be there, so people will be thinking deeper and longer about how their players should work together and the roles they fill. This is really exciting.  We could be on the cusp of a renaissance of battleground strategies as more players get involved.

We could also be on the verge of losing one of the great charms of battlegrounds, namely the casual, laid-back nature that appeals to many busy players now.  PuGs facing premades can be very frustrating for those on the disorganized side.  Sometimes, you don’t want something serious, you just want to go pwn some Horde or Alliance, and having to execute a complex strategy is not how you want to unwind.  My biggest fear with the introduction of Rated Battlegrounds is that the casual aspect of bgs will be lost.  I am holding judgement until we see more about the implementation, and see how that implementation changes people’s playstyle.  It has tremendous potential both for good and ill.

There’s an unfair expectation on hybrid classes to heal in battlegrounds right now.  My hope is that Rated Battlegrounds will bring about a greater recognition and respect for the other specs those hybrids bring to your team, and that those healers who are there are playing because they enjoy it, not out of some sense of obligation or guilt.

Only time will tell if that hope will bear fruit.

39 Comments

Filed under Battleground Strategies, Cynwise's Battlefield Manual

Simple Battleground Strategies

Battlegrounds are messy, chaotic affairs.

To put a Battleground into a PvE perspective, imagine that the only way to raid was to raid randomly. There is no attempt to fill roles; you may have no healers, or you may have no DPS. There is no gear check; not even an attempt to match gear levels. There are no teams, no organization, no defined leadership. The only communication you have is what you can type; there is no vent. Your raid size can vary widely; you might get a 10-man, you might get a 40-man. There’s no social cohesion, no social penalty for failure, no performance review.

And you have, at most, 2 minutes to prepare yourself and your team to fight.

Trying to get everyone on your team to follow a complicated strategy in this environment is simply not going to happen. Not only do you have no time to evaluate your team and determine who should fill which assignment, you have no way to ensure that players will do their jobs.

So any strategy you adopt must be simple, easy to communicate, and independent of the ability level or roles of the participants. Easy, right?

THE SIX SIMPLE STRATEGIES

Let’s cut to the chase.

  • Warsong Gulch: Protect the FC and kill the EFC. Midfield control is a means to one of those two ends. Stick together in groups both on offense and defense.
  • Arathi Basin: Take three bases and fight at the flag. It’s important enough to repeat again: fight at the flag! Travel in packs and don’t engage in the road. Defend your nodes.
  • Alterac Valley: Take and defend the enemy towers while recapturing your own. Trapping the enemy in a bad graveyard is part of this, but the towers are the key to AV.
  • Eye of the Storm: Control 3 bases, or 2 bases and the flag. 3 bases > flag. The flag is a buglight, it is noob bait, it is a shiny thing to distract you from three bases. But it can also help you win when you only hold 2.
  • Strand of the Ancients: Kill the Demolishers if you’re on defense, and protect them if you’re on offense. Use bombs when you can, stay away from the cannons, practice good graveyard control — but SotA is all about the Demolishers.
  • Isle of Conquest: Either take the Docks and protect the Glaives, or take the Workshop and kill the Glaives. It’s all about the Glaives and their ability to take down a wall quickly.

These strategies are simple and easy to communicate. You can type them out while buffing the raid, waiting for the gates to open, or even while riding to the first objective. They don’t depend on having specific types of players, or even roles. While experienced players understand how their class fits into these strategies, new players can focus on the main task at hand and still contribute.

Given the ways in which Battlegrounds are put together, this is actually about as good as your strategy is going to get. If your team follows them and executes them well, you’ll probably win.

And therein lies the rub.

EXECUTION > STRATEGY

If these strategies are so simple, why is it that they don’t seem to work all the time? How is it that you can shout out “fight at the flag!” in Arathi Basin and yet somehow still lose?

Because the best strategy in the world doesn’t mean a thing if the individual players can’t execute it.

Within your typical battleground raid group:

  • Your composition could be poor. This isn’t just needing a different class ability to get past a boss; this is completely lacking a vital role in your team. Luck of the draw gives you who it gives you, and if you’re without healers or ranged DPS, tough. Win anyways.
  • Your players could not know what their assignments are, misunderstand who is doing what, or go to the wrong place. Because there’s so little time to plan, there’s no real way to hand out assignments to individuals. At best you might be able to divide everyone up by raid groups, but that rarely works as well as you might think it should.
  • Your players could be outgeared by their opponents. They don’t play poorly, they just lacked the gear to do their assignments.
  • Your players could be outnumbered and overwhelmed. It’s very hard to overcome multiple enemies; if you do, it’s either because you’re really good, or they were really bad.
  • Your players could play poorly or AFK. Let’s be blunt; some players are not good at PvP, and some of those just aren’t very good at Warcraft. Perhaps they’re new and learning, or perhaps they just stumbled their way through it for years. Or maybe they’re completely AFK, leeching honor. Either way, they’re not getting their jobs done.

In many ways, it’s a wonder anyone wins any battlegrounds at all! The best strategy in the world means nothing if your teammates fail to win the fights they need to win.

Fortunately, there are things you can do to combat these problems.

  • Talk in /bg chat. Don’t just talk about the strategy — call out incomings, tell people where you’re going and where the enemy is going.
  • Identify healers early and often. Make sure everyone knows who they are so they can protect them.
  • Learn to win the 1:1 matchups. I don’t like dueling per se, but it’s great practice for you to learn what to do when the only one you can rely upon is yourself.
  • Make sure your character’s gear and skills are as good as you can make them. You don’t have to min/max, but train up your professions, come prepared with food and bandages, add some PvP gear in there to help you win.

Individual excellence matters. It’s what powers the simple strategies above – the ability to have players do their jobs.  Battlegrounds are no different from heroics or raids in this respect — you have to have people who can do their part.  And the more people who do well, the better off your strategy works.

Individual excellence matters.  Strategy matters.  But individual excellence en masse matters more.

The six simple strategies will work for you — but only if your team can execute.  You have to have a strategy to work together as a team, but your team has to do their job as individuals to make the strategy work.

Given how chaotic the battleground is, these strategies are the best you can hope for.  The rest is in your hands.

23 Comments

Filed under Battleground Strategies, Cynwise's Battlefield Manual

Graveyard Control in Alterac Valley

If Fight at the Flag! is the best tactical advice I can offer in the battlegrounds of Azeroth, establishing graveyard control is the best strategic advice I can give.  It’s an essential concept to understanding how battlegrounds are won and lost, but it’s not an easy one to grasp at first glance.

Graveyard control doesn’t have a catchphrase that can be shouted out in /bg chat.  It’s not something that has an easy, universal application.  Sometimes it involves making calls that seem counterintuitive, or downright crazy to other players.

But believe me when I say it’s absolutely critical to winning.

RESURRECTION VECTORS

What happens when you die?  Where do you go?

This is not a metaphysical question in the battlegrounds, but instead a matter of deep pragmatism and strategy.  When you die you aren’t taken out of the battle permanently.  Instead, you’re sent to the closest penalty box, told to go sit in the corner and think about what you’ve done, and wait out your resurrection by the local friendly spirit healer.  Running back to your corpse is a bad idea, because all it takes is one enemy to loot your insignia and… poof, you’re stuck away from the graveyard with no corpse to reenter.

Resurrection waves come every 30 seconds, as the spirit healer … I don’t know, needs to recharge?  Wants to make sure you’ve thought about what you’ve done wrong?  Whatever it is, every 30 seconds the graveyards pop out another set of reborn heroes, ready to buff up and fight again.

Which graveyard you go to depends upon where you died:  you always go to the closest graveyard under your side’s control to your corpse.  This is what I call your resurrection vector – the direction you will go when you die.

Understanding where you and your teammates will go when you die is important.  Knowing where your opponents go when they die is critical.  Why?

Because by controlling which graveyards are available to them means you can relocate your opponents to places which no longer have strategic value.  You can send them away from the node you are attacking, away from the flag room, away from keep defense, all by controlling which graveyards are available to them.

In some battlegrounds, like Arathi Basin and Eye of the Storm, the graveyards are closely aligned with the respective nodes.  If the Alliance controls the Blood Elf Tower, fallen defenders will resurrect at the nearby graveyard down the slope.  If the Horde controls the Blacksmith, their dead will return from the graveyard on the other side of the building.  In other battlegrounds, like Alterac Valley and Strand of the Ancients, they are not associated with specific objectives, but are rather separate places to contest and control.

Because the graveyards are completely disassociated from the towers in Alterac Valley, let’s use AV as our example to illustrate how resurrection vectors and graveyard control works.

THE NINE GRAVEYARDS OF ALTERAC VALLEY

Alterac Valley is an epic battleground.  Seriously, it’s huge.  Including the 9 graveyards, there are 23 objectives in the battleground to be controlled or destroyed.  If we added in all the quest-related objectives, there are over 30 different objectives, but since those rarely come into play these days let’s narrow our focus to just the graveyards.

Did I mention this place was big?

Each side begins with 3 graveyards and their spawn point: Stonehearth (SHGY), Stormpike (SPGY), and the Dun Baldar Aid Station (AS) for Alliance, Iceblood (IBGY), Frostwolf (FWGY) and Frostwolf Village Relief Hut (RH) for Horde.  Snowfall Graveyard (SFGY) is neutral at the start.

It will take you at least 5 battles before you figure out where all the graveyards are while playing.  Seriously.  And then people will only speak in acronyms, so those subtle differences between SHGY and SPGY (and Icewing versus Iceblood) will still trip you up.

The two caves (Dun Baldar Pass and Rock of Durotan) are the initial spawn points.  Players will get sent back there if there are no other graveyards available.  Since they are a little special, I’ll fade them out until they become important in future diagrams.

Graveyards, like the towers in AV, need to spend 4 minutes in a neutral state before they change to the opposing side.  So for the first 4 minutes of the game, the Alliance cannot resurrect any further south than Stonehearth and the Horde is forced back to Iceblood.  This means that any casualties on the other side of the Field of Strife will come back across midfield and reset there.  The resurrection vectors during this initial time look like this:

The simple way to say all of this is, if you are Alliance:

  • If you are south of the fork in the road by the lake, you will rez at Stonehearth.
  • If you’re north of it but east of the bridge, you’re probably going to Stormpike.
  • If you’re west of the bridge in Dun Baldar, you’re going to the Aid Station.

If you are Horde, it’s a little more linear:

  • If you are north of Tower Point, you’re going to rez at Iceblood.
  • If you are south of Tower Point but north of Frostwolf Keep, you’re going to Frostwolf.
  • If you are in Frostwolf Keep, you’re rezzing at the Relief Hut.

Obviously, this all starts to change once the battle begins, depending on the strategies used by each side.  But in many cases, this initial setup is going to be the one we keep coming back to over and over again.

Let’s look at a few common AV scenarios to see how graveyard control works in practice.

THE ALTERAC BLITZ

The Alterac Blitz is when you focus upon one thing, and one thing only — killing the enemy general as quickly as possible.  Whatever defense is offered by the blitzing side is irrelevant; the key is that there is a coordinated effort to get as many people to the opposite end of the map to kill the general.  Any towers or graveyards assaulted are incidental; the key is killing the general.

The Blitz is extremely challenging at lower gear levels due to the presence of 4 very big, very angry adds surrounding the general.  Each Warmaster or Marshall is linked to 1 of the 4 towers on that side, so the more towers that are up, the more adds are in the room.

Did I mention the buff they give the general, too?  Oh yeah.  Each one gives a +25% stacking buff to the general’s health and damage.  Stacking.  So if all 4 towers are up, the boss is +144% health and damage, and there are 4 adds in the room who can’t be pulled separately.

Before ToC and ICC, the most common way to do this was to run 2 well-geared tanks, 4+ healers, and as many DPS as could fit all the way down the map, where the MT would tank the general, the OT would tank the adds, and everyone would DPS as fast as possible to get the boss kill.  As gear improved, however, single-tanking the room became possible.  Watching a single ICC-25 geared tank hold aggro on the entire room is an awesome, awesome sight.  But no matter how it’s done, the map almost always looks the same.

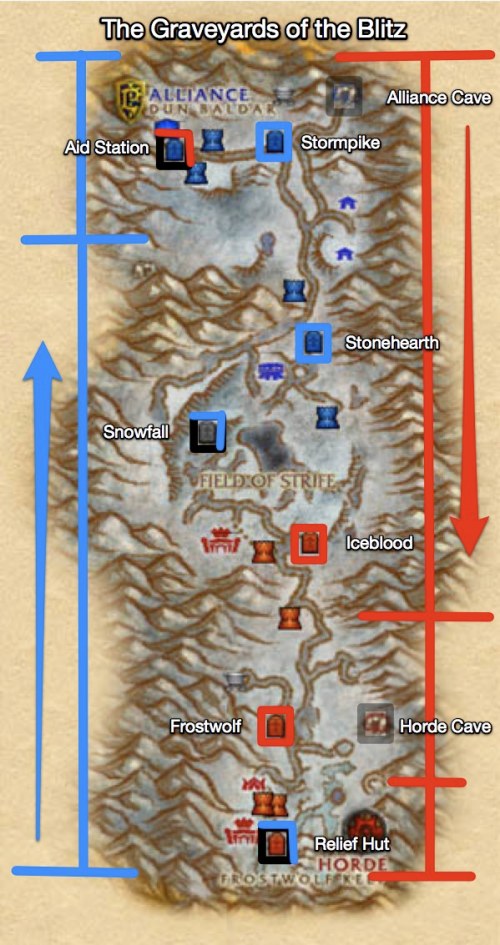
The only graveyard that each side usually takes is the one right next to the general: the Aid Station and Relief Hut.  And the Alliance takes Snowfall Graveyard, because it’s right next to their running path across the Field of Strife.  Someone always peels off to assault it.

However, because the Blitz is so fast, the resurrection vectors are still mostly in their initial state.  They’re a little worse for defenders if the AS and RH are actually assaulted, as any deaths will send them outside the defensive bulwarks of their respective bases, but for the offense the resurrection vectors are even worse.  You can’t continue the assault if you are suddenly 2/3rds of the map away, either at Iceblood or Stonehearth.  Any losses by the offense cannot be replaced.  Less obviously, casualties can’t switch to defense because they are 1/3rds of the field away from their own base, and (usually) the opponent is already pulling the general.  So you can’t attack, you can’t defend.

Your only real hope at that point is hoping your opponent wipes on the general as well.

The Alterac Blitz is a high risk, high reward strategy.  When it works, it’s brilliant.  And when it fails, it fails spectacularly.  It is highly dependent upon clutch performances by a few people — the tank(s) and healers — and as such is easily disrupted.  A single stealthed druid casting Typhoon at the right moment will wipe your entire Blitz.

The Alterac Blitz completely ignores graveyard control in favor of achieving the victory condition.  If you wipe, you are completely at the mercy of your opponent.  What’s scary is that the graveyard map above is the best case scenario for the Blitz; if your opponent assaults all the graveyards along the way, you can be sent all the way back to your spawning cave!

I don’t like the Blitz.  More specifically, I don’t like the current incarnation of the Blitz and how it plays out.  It can work, and it can work well when properly executed.  With the right team, you can rack up an impressive number of wins in a short period of time.  But those Blitzes are sadly the exception, not the rule.  Too many Blitzes start without a solid tanking and healing team identified, yet the entire strategy depends upon them.  Charging the enemy general without knowing how you’re going to kill them is like going all in during a poker game before the cards are even dealt.  It’s foolish.

The Blitz focuses upon the PvE aspects of the battleground to the exclusion of the PvP.  If you do it right, your team never comes into contact with enemy players, or perhaps brief contact with their defenders in the enemy base.  If you really Blitz right, it’s nothing more than a competitive PvE race to kill a boss.

Before 3.3.3, the Blitz was a good way to grind honor if your team was good and your opposition didn’t know what was going on.  I don’t think it’s nearly as good of an honor grind now with the advent of the Random Battleground Finder and massive honor boosts in all the battlegrounds, so hopefully people will start looking at other ways to play AV.

The Blitz requires a team to commit to it fully because the price of failure is so high.  Recovery from a failed Blitz is very difficult because of the complete lack of graveyard control and the resurrection vectors present at the time of the wipe.

ISLAND HOPPING

In contrast to the Blitz, where no graveyard control is displayed, Island Hopping battles focus on isolating the opponent from effectively attacking or defending.  The key is skipping non-essential targets and focusing your attention on taking towers while defending your own territory.  While sometimes you’ll see this strategy used during Blitzes, the Blitz is over too soon for graveyard control to matter.

(Island Hopping is the strategy used by the United States in the Pacific Theater of WWII; whenever an island had no strategic value, the US simply moved around it to the next target.)

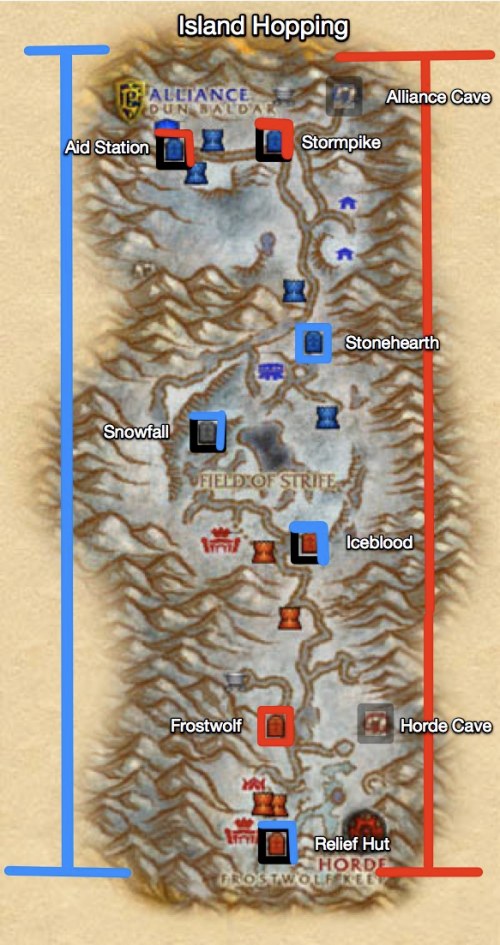
Alterac Valley’s map is asymmetrical, and those differences of geography matter while Island Hopping.  Here’s what it would look like if both sides hopped but conveniently forgot to defend:

You can see both sides have taken each graveyard along the way but one.  That one graveyard becomes the place where all casualties over the entire map will go.  For some, it will mean moving forward.  For many, it will mean going backwards.  But for all of them it means getting sent out of position.

The above map doesn’t show any defense — we’ll get to that in a second.  But for each side, it takes the least advantageous graveyard for the opponent and sends casualties there.  Let’s take each in turn.

The Horde should skip Stonehearth Graveyard because:

  • Stonehearth does not control a choke point, unlike Stormpike GY.
  • It is on the wrong side of the Icewing choke point, allowing the Horde to use IWB as a defensive bulwark.
  • Stormpike GY is useful as an assault point against Dun Baldar, even if the Aid Station is still under Alliance control, both due to closeness and straight LoS across the bridge.
  • Sending Alliance casualties to Stormpike only gives the bridge as a defense against their rez waves.  Sending the Alliance to Stonehearth allows the road and canyons to be used as additional defenses against Alliance trying to get to Dun Baldar.

The worst thing you can say about leaving Stonehearth in Alliance hands is that does make taking the two adjacent bunkers more difficult for the Horde.  But a common way around that is to wait for Snowfall to go Alliance, and then assault Stonehearth anyways.  At that point Snowfall graveyard becomes a trap.

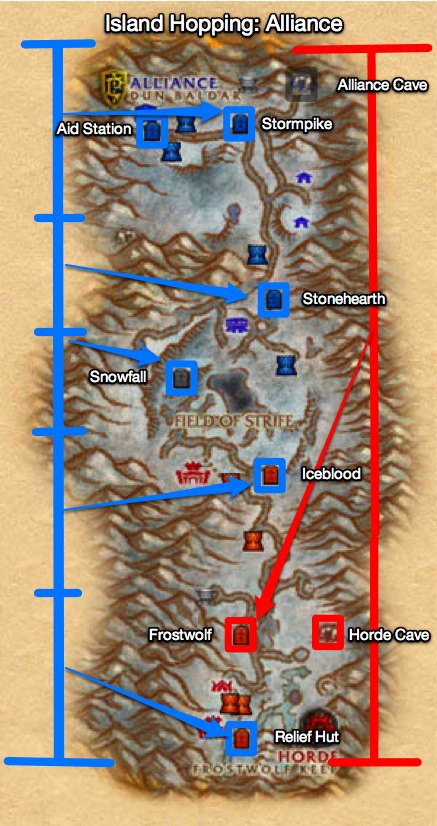
An important thing to consider is the location of the Alliance Cave.  If no graveyards are available for you to resurrect in, you go back to the cave.  The Alliance cave is more defensible than the Horde cave, and it’s very easy to get to Dun Baldar.  Sending Alliance casualties back there is less optimal than sending them to either Stonehearth or Snowfall, like so:

Smart Horde players will look and see if the Alliance captured Snowfall before taking Stonehearth.  Ideally, the Horde should wait until Snowfall is actually under Alliance control before taking Stonehearth away.  And at no point should they try to send them back to the cave in Dun Baldar pass, because that’s too close to Dun Baldar and SPGY.

Astonishingly, the situation is somewhat more complicated when we look at the Alliance’s situation.

THE PROBLEM OF FROSTWOLF GRAVEYARD

The rule of thumb when playing Alliance is: skip taking FWGY unless you want to have a lot of players yell at you.  The conventional wisdom is that taking FWGY will lead to a turtle; more specifically, taking FWGY before the Relief Hut will lead to a turtle.

The idea is relatively straightforward and has some merit.  If Frostwolf Keep and Village are heavily defended, Horde casualties will be sent back to the Relief Hut, where they can further fortify the position, causing a defensive war at the bulwark.  If FWGY is still under Horde control, casualties at the bulwark move forward to FWGY, on the other side of the defenses, so that they have to run through the gauntlet to rejoin the fight.  While you’re now fighting a two-front battle, at least the FWGY forces are being corralled into narrow passageways, unlike those still inside the Keep.

Let’s take a look and see the result of this strategy.  If FWGY is allowed to remain under Horde control, this is what the map looks like after a few minutes:

The tactical situation within Frostwolf Keep is exactly as predicted; casualties are going to FWGY, north of the defenses.  The biggest problem is that all Horde casualties are going to a spot just north of the Alliance offensive, where they can turn south and demolish them.  The only thing that saves the Alliance offense is that the Horde casualties come in small waves, instead of one large group.  If the Horde groups up in FWGY and then does a concerted assault on the Alliance in keep, they can do a lot of damage.

Now, the conventional wisdom is actually completely, 100% correct here.  If you take FWGY before RH, then all casualties, all over the map, will go to the Relief Hut and make Frostwolf Village a defensive monster.  So skipping FWGY in favor of RH makes sense.  (Taking FWGY after RH doesn’t really matter, because the Horde Cave is right across the field.  It actually worsens the Horde position somewhat to do so, but people will still complain you took FWGY.)

But look at the map again, and compare the resurrection vectors to the Horde map.

By hopping over Stonehearth and Snowfall graveyards, the Horde create a situation where the Alliance is sent to the middle of the map.  This is bad when the middle of the map is being contested, but very good for the ends — which means assaulting Dun Baldar and defending Frostwolf Keep.

The problem with the Alliance map isn’t Frostwolf graveyard, it’s Iceblood and Snowfall.

IBGY is the best graveyard in the game from a terrain and positioning standpoint.  Like Stonehearth, it’s close to two towers.  Iceblood is on the defensive side of the chokepoint, however, whereas Stonehearth is on offensive side.  Furthermore, IBGY is the only graveyard in the game that doesn’t resurrect you in a canyon; you can turn and immediately ride north across the Field of Strife without passing the graveyard flag.  Every other graveyard forces you to travel some distance before you get back into the battleground, but not IBGY.  You can reinforce the defense or offense from it.  It’s perfect for protecting TP and IBT, and control of it blocks the chokepoint.

Snowfall, on the other hand, is probably the worst graveyard in the game, but it is irresistible to Alliance. The Alliance path across the Field of Strife favors the west side towards Galv and IBT, while the Horde favor the right to SHB and Bal.  The ramp to SFGY is right there when you’re running south as Alliance.  Someone always peels off to go cap it.  And while it might help during the assault on IBT/TP, it becomes a serious liability when the Alliance gets to FWGY.

IBGY is too good not to take, and SFGY is too easy not to.

I said in the very beginning that graveyard control sometimes makes you do crazy, non-intuitive things.  This is one of those situations where in order to get your opponent’s resurrection vectors to go where you want, you are probably going to have to do some crazy things.

Either:

  • Take all the graveyards except FWGY, and move your defensive line south of the Field of Strife.  Hold the Tower Point checkpoint as strongly as you can and let no Horde pass.  Trinket back if a stealther gets through.
  • Take all the graveyards and bottle the Horde up in the Cave.  This only works if there’s a large difference in players, which hasn’t been the case in a few patches.
  • Give up SFGY or SHGY to the Horde and strongly fortify the south bunkers.  (Or yield the south bunkers and hold the line at Icewing Bunker.)
  • Direct the Horde to FWGY while IBT and TP are falling, then let the Horde go north unopposed to IBGY while the Alliance goes full on offense.

The Alliance can certainly win if the Horde is concentrated in FWGY, and it is preferable to concentrating the Horde at the RH.  Is it the best option?  No.  But it’s not the worst option for graveyard control, so it’s worth pursuing.

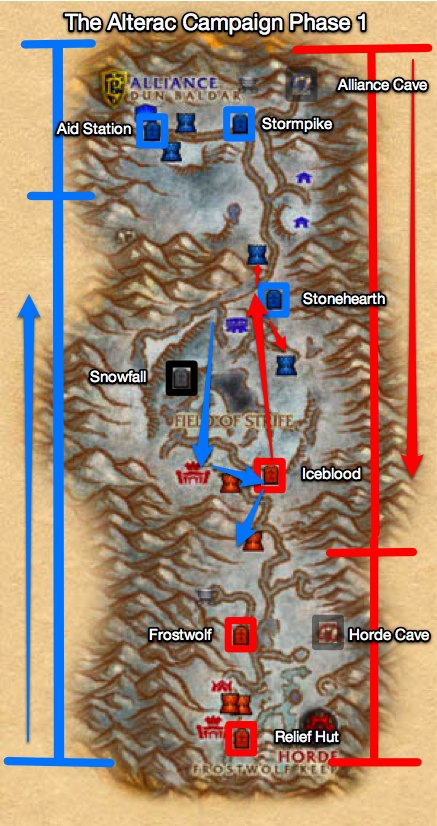
THE ALTERAC CAMPAIGN

Back when Cynwulf was a 59 DK twink, I had a macro I would spam at the beginning of every Alterac Valley:

Welcome to AV! If this is your first time here, kill Galv, take the towers, kill Horde, defend towers until they fall, then kill Drek.  Got it?  Let’s go!

At level 60 (in WotLK), it’s really tough to get tanks who are geared enough to take on Drek/Vann+4.  The Blitz is far too demanding at this level to have everyone do it all the time, and while there is still a rush down to Drek, it’s a controlled rush.  Taking the towers while defending your own is the name of the game.

Unlike the previous two strategies discussed, this one actually relies heavily upon the PvP skills and abilities of the combatants.

Each force will send the majority of its forces towards the opposing captain on the other side of the Field of Strife.  The Horde will charge through IBGY along the east side of the Field of Strife, while the Alliance will pass Bal’s bunker on the right and take the west side straight to Galv.

The majority of each force will go after the respective captain, while small teams tend to peel off to take the nearby towers and graveyards.

The initial rush changes the resurrection vectors substantially as graveyards are assaulted.  If the towers are defended, casualties are going to start going back even further than the initial phase once the graveyards are assaulted, like so:

It’s at this point when PvP usually starts happening.  Stragglers meet on the Field of Strife, some players like to stay back and defend the towers and captains, others turn back to help defend… it can become very chaotic at this time.  Small unit tactics and individual contributions are essential during this phase — move in packs, protect your healers, engage when you outnumber the enemy, otherwise evade or slow them down to let others catch them.

You can see the value of a good midfield defense during this phase when graveyards are in play.  Casualties will be sent all the way across the map and be taken out of the midfield arena if they die now.

By the time SHGY and IBGY change, both of the Captains are likely down, and the towers are either going or have gone down.  This phase really depends upon your team’s ability to execute and then defend the targets as they are taken.

Once the graveyards have flipped, things polarize.  If you win the fight at midfield, you’ll have the advantage going into the next phase.

All the casualties at midfield have become your defense, as their resurrection vector punted them back to either SPGY or FWGY.  The strength of your defense is proportionately strengthened by how badly you were hurt at midfield, so while it’s possible to have two balanced battles going at once, in practice usually one or the other has the majority of players and becomes the central focus of the battleground.

Taking the graveyards on the opposite side of the Field of Strife polarizes the battlefield.  In the previous phase, the emphasis is entirely upon midfield.  Once the graveyards flip. you can see there’s a lot more corpse movement, both forward and backward.  Capturing (and holding) graveyards on the other side allows your offense to establish a beachhead to launch their attacks.  It also prevents a complete reset, like we see in a failed Blitz.

Consider the following example.  The Horde having a strong offense that dominated at SHB/IWB and left enough people behind to inflict a lot of casualties on the Alliance offense at IBT/TP.  There are more Alliance casualties than Horde casualties as a result of this phase.  The Alliance force resurrecting at Stormpike will be larger than the Horde force going to Frostwolf, but the Horde offense moving north is larger, too.  The battleground population shifts towards Dun Baldar.  The Alliance offense down south becomes progressively weaker with no reinforcements, and while they are able to assault and hold towers until they fall, they are impotent to tackle Drek on their own.

From this phase, it’s a matter of execution.  One side or the other will dominate and push forward into the enemy base, either pushing them aside (the lessons from Island Hopping apply here) or forcing them aside until they rez on the other side of the Field of Strife.

Whatever happens next, it’ll be epic.  And it’ll be the Alterac Valley I love.

CAPTAIN’S GAMBIT

I’ll leave you with one last example of graveyard control in Alterac Valley for your consideration: the Captain’s Gambit.

The Captain’s Gambit is when you don’t defend your general, you defend your captain instead.  As few as five and as many as twenty players peel off from the main assault and go into the captain’s bunker to help defend them.  When the other side comes roaring in for the easy kill, they find considerably more than they bargained for and sustain heavy losses.  If the defenders die, they are either sent to the midfield graveyard (if it hasn’t been assaulted), or the next defensive graveyard, SPGY or FWGY.  Either result is fine for them as defenders.

The attackers, however, are sent back to a graveyard that is likely under assault.  If enough casualties are inflicted, the offense is shattered and doesn’t have enough people to dominate any further conflicts.

Let’s take the example of the Alliance running the Captain’s Gambit on the Horde.

The Horde concedes Galv to the Alliance, focusing instead upon SHB and Balinda.  The Alliance chooses to defend Bal.  Galv falls easily, while Bal does not.  The Horde offense is sent back to FWGY, while the main part of the Alliance offense is already on its way past Tower Point.

The result of the Captain’s Gambit is that the front moves very quickly from midfield to the FWGY/TP area, with the Alliance setting up a defensive bulwark at IBGY.  Because the Horde advance was stopped so early on, no footholds are established for them to launch assaults on Alliance bunkers, so the Alliance defenders are able to move up to support the offense and support the push into Frostwolf Village.

The population of the battleground shifts to the south, and the front moves with it.  The Horde is now at a disadvantage both in position and resources, as losing Galv and towers depletes their resource pool dramatically.  Even if it turns into a slugfest by the Rock of Durotan and Frostwolf Village, the Alliance has the upper hand.

You will notice that I call this the Captain’s Gambit, not the Captain’s Sure-fire Way Of Winning Alterac Valley.  That’s because there’s an element of risk and sacrifice involved.

First, the Horde could have chosen to skip Bal and go straight to Vann.  If they’re Blitzing in any way, this is actually likely to happen.  There might be a few stragglers who decide to take her out, but not enough to really make a difference.  This is definitely the biggest risk — that the enemy will refuse to take the bait.  The impact of this depends on how many people stayed to defend Bal.  If it’s 5, okay, no big deal.  Twenty?  Yikes.

Second, there’s a sacrifice involved with the people who stay behind.  They are going to have a hard fight on their hands.  It’s not as easy to cause a raid to wipe with the Captain as it is with the Generals +4, and there’s every likelihood the defenders are going to get facerolled.  But it’s not a hopeless task, and even failure just means moving further back in the defensive line, falling back towards your own base.

GRAVEYARD CONTROL

Alterac Valley makes a fascinating study of graveyard control because the graveyards are separate and distinct resources to capture.  They’re also unrelated to the victory conditions of AV; they add no resources to your total, nor can they kill the enemy general for you.

Yet, they are a critical part of whatever strategy you adopt.  Controlling where you will resurrect — and where your enemy will, too — is an important part of the battle.  You have to understand resurrection vectors to be able to predict what is going to happen next within the battle, but also so that you can get better for the next one.

You’ll find this concept in every battleground with controllable graveyards.  The lessons from Alterac Valley apply everywhere; Strand can be lost by capturing the wrong graveyard, and Isle of Conquest can be won by getting the Keep’s defenders out of the way with a graveyard snatch.

So, good luck out there.  May the spirits of your enemies be sent to a place with no strategic value!

(Yeah.  I’m still working on a good catchphrase for this concept.)

29 Comments

Filed under Battleground Strategies, Cynwise's Battlefield Manual

Fight at the Flag!

Fight at the Flag.

You’ll hear this saying many, many times in battleground chat. If I could only give one piece of advice for how to fight well in the battlegrounds, this would be it. It’s that important.

When you hear people saying this, it is both a reminder and a warning — make sure that when you engage the enemy, you do so at a strategic point. The key is fighting where your battle has meaning, and not needlessly dying over a piece of dirt that means nothing.

SEIZING THE FLAG

In most battlegrounds, the strategic points are the flags. In some, like Arathi Basin and Warsong Gulch, they’re the whole game. In others, they are part of a strategy, usually of resource or base control. And if there’s a flag to be captured, you should most likely be fighting next to it. An 8-second lull in the battle is enough to capture a node, but you can’t do that if you’re not near it.

The offense should do whatever they can to get to that flag. Get up the AV tower and fight around the ring of the bunker, get to the EoTS node and stay there, ride as close up as you can to the AB flag and click it when they’re not looking. In Warsong Gulch, you should be relentlessly pursuing the EFC to kill and retake your flag.

Because it takes so little time to capture a flag, defenders should remain in range and in LoS of the flag to prevent it from getting captured. This doesn’t mean all defenders should be at the flag at all times, but it does mean that some of your force needs to physically protect that flag. Depending on the terrain and situation, it’s often appropriate for some of the defense to move forward to hit the offense before they can get to the flag, as establishing distance from the flag always favors the defense. If you can push the offense away from the node, then they are less able to capture it. But you have to be near it to protect it.

Now, there are strategic and tactical reasons for not fighting at the flag, almost all defensive. The bridge at Dun Baldar and gatehouse at Frostwolf Village in Alterac Valley come to mind; they give too much tactical defensive value to yield unfought. There can be tactical value in the surrounding structures and terrain which you should take. But the further you get away from the flag, the less safe it actually is.

This idea should be straightforward. You have to be near the flag in order to take it. You have to take the flag to win it. Ergo, fight near the flag.

But that’s not the only reason why you should fight at the flag.

GRAVEYARDS AND RESURRECTION VECTORS

Arathi Basin is the canonical Fight at the Flag battleground. There are 5 nodes arranged in a diamond shape around a central point. Each node has a flag next to a building of some sort, and can be captured by clicking on it and channeling for 8 seconds. When you capture a node, you control the resources from that node, and you gain control of the adjacent graveyard. The nodes are interconnected through a series of roads and bridges.

Here’s a map of Arathi Basin.  (You’ve been there before, I hope.)  The white circles are the nodes with approximate flag location, the squares are the graveyards.

The road areas in pink are bad places to fight. Even though they are choke points, they are the most worthless areas of the map to contest, and not just because they aren’t near a flag.

It’s also because they’re not near a graveyard.

Death in PvP is a temporary thing. It’s like a 30 second penalty that strips all of your party buffs. It also sends you to an out-of-the-way location to rez; in AB it’s on the other side of whatever structure is at that node. So if you die while defending a node, you have up to 30 seconds to wait to get rezzed, another 5 seconds to rebuff, and then 5-10 seconds to get back to the flag. So depending on your luck, you might be back in 15 or 45 seconds. As long as the flag stays in your team’s possession during that time, all defenders will come back.

The offense has a tougher time of it. The penalty for dying is getting sent back to a graveyard you do control, which may be on the other side of the map. So while you might have an epic battle going for the Lumber Mill, if you haven’t captured any graveyards yet, your reinforcements are going to go back to the spawn point, not to the Stables or Farm — even though you may have assaulted those flags.  Graveyard placement is vital.

Let’s continue with Arathi Basin to illustrate this point further.  We’ll take a traditional 5/5/5 middle offense versus an 8/7 hook rush.

The Farm and Stables are assaulted as a matter of course.  The Horde attacks strong-side (Lumber Mill and Blacksmith) while Alliance sends 5 to each node.  Assuming no huge individual imbalances at any given fight, they should result in the following map:

The vital thing to notice here is that NO graveyards are captured yet, only the spawn points.  Everyone is on offense, so death means you get sent halfway across the map.  Because the Horde outnumbers the Alliance at their chosen nodes, they take them with fewer losses than the Alliance are able to inflict.  So the Alliance has 2/3rds of their team sent back to their spawn point, while far smaller percentage of the Horde resets.

While all this is happening, the close graveyards (Stables, Farm) start flipping as the nodes are actually captured.   However, the battle is already turning against the Alliance:

With only two nodes solidly in either faction’s control, the Horde is in a much better position as they move into the next set of fighting because of the graveyards.  As 2/3rds of the Horde assault the Stables, they are about to have two graveyards come under their control.  If they fought at the flag and assaulted the node early in the first fight, then they will have one or two nearby graveyards to reinforce the Stables fight.  The Alliance is in worst shape; they have a weak force entering hostile territory, with reinforcements coming from three sides.

Removing the vectors, this is where your people will be.

This is why you fight at the flag.  Right here is the entire match — if the Horde can take the Stables Graveyard from the Alliance, then all reinforcements from the main battle will go back to Trollbane Hall, completely isolating the Alliance offense.  If the Horde fails to take the Stables, they still have the close graveyards of the Blacksmith and Lumber Mill to regroup at and hold to apply pressure on the Stables and Gold Mine.

If the Alliance can take the Farm graveyard, they strengthen their position and disrupt the Horde’s march to a 4-5 cap.  They’ll send the Horde back to the spawn point or the Blacksmith.  They’re at a disadvantage compared to the Horde due to having to divide their forces between the Mine and the Farm, but it’s the best they can do with the situation.  If the Horde shifts away from the Lumber Mill, or sends troops back from the Stables to take the Gold Mine, the Farm offensive is in real trouble.

I’ve been talking in terms of holding engagements near the flag at each node.  Let’s consider what happens if you fight in the road, instead of at the flag.

If the Horde engages away from the Stables flag:

  • Horde casualties will go back to the Blacksmith, or maybe the Lumber Mill (depends on which road and where.)
  • Alliance casualties will stay at the Stables.

If the Alliance engages away from the Farm flag:

  • Alliance casualties will go back to the Gold Mine, which will be vulnerable to attack.
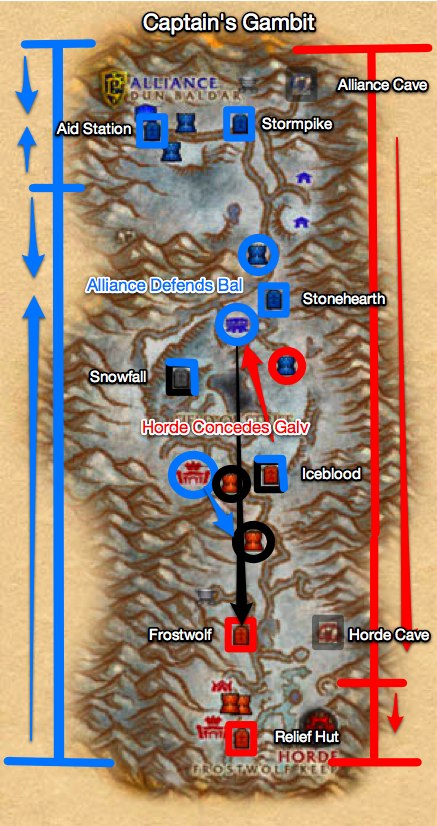
  • Horde casualties will to stay at the Farm.
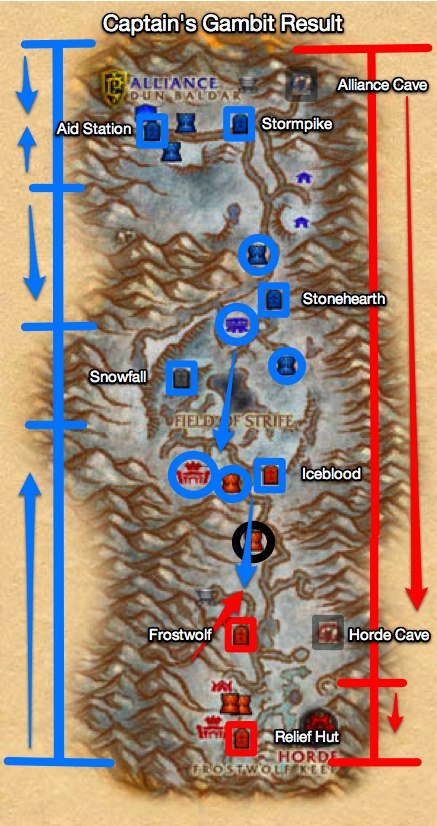
If they both do these things, then the map will stay exactly as it is right now, with Horde leading 3-2.

If one group fights at the flag and takes the graveyard away from the opposition, however, they increase their odds of winning dramatically.  Alliance has a shot of going 3-2, and the Horde can dominate with a 4-1 (and should go for a 5 cap at that point.)

Here’s what phase 3 looks like if both sides fight at the flag.

Now, the Horde still has the upper hand at this point, but the Alliance has driven a wedge into their march to a 5 cap.  Whichever side is able to continue to send dead opponents away from nodes will come out on top, and the only way to do that?

That’s right.  Fight at the flag.

UNIVERSAL LAW

Arathi Basin is one thing, where the graveyards and nodes are right next to each other.  But does that mean that “Fight at the Flag” is universal?

Yes.  Yes, it does.

  • In Warsong Gulch, you should be fighting to protect your flag carrier or trying to kill the enemy flag carrier.  All other places where you fight — midfield, in the enemy base, in your base — all need to be considered with where the two flags are relative to you.  I’m not against fighting in midfield per-se; it just needs to be done with an awareness of what you’re doing (forward defense of your flag, clearing a path for your flag carrier, etc.).
  • In Alterac Valley, the towers and graveyards are separate, but each one requires several minutes between assault and capture.  If you do not defend the flag once you’ve assaulted it, you deserve to have it recaptured by the enemy.
  • In Eye of the Storm, the bases serve as the flags, and are what you should focus on.  The presence of an actual flag confuses things, but you really don’t want to fight at it unless you have to.  This is the only place where I’d say “Fight at the Base” instead of “Fight at the Flag,” because 3 bases > flag.
  • In Strand of the Ancients, the walls and graveyards are separate, and while you have to carefully manage which you capture, the walls are your main objective.  Getting stuck in a firefight on the beach means your demolishers can’t hit the walls.  (Consequently, fighting on the beach or on the roads favors the defenders.)
  • In the Isle of Conquest, control of a node equals control of a nearby graveyard, as well as special abilities or vehicles that you need to win.  If you can capture the enemy Keep, you make it very difficult for defenders to reinforce the generals.

Fighting at the flag is the one strategy that applies to all of the Warcraft battlegrounds.   (Yes, even EotS.  Hush.)  You fight at the strategic points to both seize control of the key resources of the battleground and to redistribute your opponents to your advantage.

So take my advice.  Fight at the flag.

37 Comments

Filed under Battleground Strategies, Cynwise's Battlefield Manual

Battleground Exploits

I remember riding back to the Stables at Arathi Basin and finding an Undead Mage on top of the roof, running around and slaughtering the Alliance troops underneath him. It was a mad run to try to DoT him up before he could kill me with massive amounts of fire or dive to the other side of the roof to heal. The stalemate was only broken when a Night Elf Death Knight also climbed up on the roof and killed the Mage.

It took me a while, but eventually I learned how to get up on that roof myself.  I’ve seen dozens of people do it, but it always seemed a tough climb for me, much like getting to the top of the Blacksmith in Goldshire.  I could never do it reliably, but if I’ve got nothing else to do while guarding the Stables I would give it a try.  When I could do it, defending became much easier.

Blizzard considers climbing onto the Stables roof to be an exploit. It doesn’t matter if you climb up via the outhouse, jump the side building, or float down via parachute cloak from the Lumber Mill — if you engage in combat from that roof, they consider it an exploit.

Yet… it’s something that is possible within the confines of rules of the game.  There’s no software being hacked, no mods being used to change any code — just some creative jumping and use of terrain to let you target opponents without them easily able to engage you in return.  Not that it’s impossible — just difficult.

I play a battleground to win.  I might play it for other reasons, but almost always, my goal is to win.  It is my duty to use every bit of my grey matter to outplan, outthink, and outfight my opponents to reach that goal.  I use potions and flasks to expand my abilities.  I use Frostweave Nets like nobody’s business.  And you better believe I will climb up on that roof to defend the Stables if need be.  Every advantage will be pursued.

Does this attitude surprise you?  It shouldn’t, and I suspect you share it.

Within the confines of Warcraft there are strict, specific limits on the things I can do and cannot do.  I cannot blow up the tunnel in WSG, even though I have charges that can blow apart a wall in the Strand of the Ancients.  I cannot use grappling hooks or ziplines to get from the Lumber Mill to Blacksmith to Mine quickly.  I am completely limited to those things that the developers allow my character to do.

How is jumping on to the Stables roof — something any character can do, though perhaps not easily — an exploit, if I’m able to do it in the game?  If hundreds of players can do it?  Through jumping?

Let’s take another battleground example: getting on top of a wall or pillar in Wintergrasp Keep by flying into position before the game starts.  Trivially easy to do, and you can take out defensive cannons and defenders with ease up there while exposing yourself to minimal risk. Smart use of the roofline and LoS, just like on the Arathi Basin Stables roof, allows you to be effectively unreachable by other players on the ground.

Is that an exploit?

The blue post says,

Players accessing any area of Arathi Basin in order to engage other players from a safe vantage point but avoid combat themselves is considered a reportable exploit.

If we use that definition, this is the very essence of an exploit.  But yet — it’s allowed to happen.  You don’t get kicked off the top of a wall when you land there, you get to stand and kill cannons with impunity.  Interestingly, if you’re on a tower you do get kicked to the ground — but only when the battle first begins.

So what gives?  Is this an exploit, or not?  I’m not trying to deliberately break the rules here, but if I can do it in the game… why shouldn’t I?  Why shouldn’t you?  How are you, someone whom I assume is not a Blizzard developer, to know if this is right or not?

I find myself in complete agreement with Cassandri when she says there’s no such thing as an exploit, at least not in the context of in-game mechanics.  There might be bugs, but bugs are not the fault of the user.  We cannot be expected to know the intent of the developers.  Quoting from that excellent article:

…(B)ecause they exist unchanged in the game, that implicitly confirms that they must be working as intended – otherwise they would be changed. We accept them and the best of us turn them to our advantage.

You don’t question whether it’s intentional or not. It’s not your place to question what is and isn’t a mistake in the game. You are a gamer. It’s your job to win.

Cass is writing about PvE in general, and the banning of Ensidia for the use of Saronite Bombs in the 25-man Lich King world first kill.  I’m staying away from discussing that specific topic because it is a charged, emotional debate about ego and bragging rights.  There  is the additional component of whether Ensidia, or Exodus, or any of the other guilds who have been taken to task for exploits in PvE, “should have known” that the encounter was not working as designed.  That’s the whole crux of the debate, actually, which is why it’s so complicated.

PvP is simpler.  If you don’t pursue every advantage — be it in gear, skill, level, consumables, positioning, macros, addons, communications, whatever — someone else will.  If you don’t send people on the walls and towers of Wintergrasp, the other side will.

And if they have an advantage that you choose not to take, you will probably lose.

I don’t want to get banned by Blizzard.  I enjoy playing their game and try to follow all the rules they set forth in their ToS.  I’m not trying to cause problems with their code or servers, or gain an unfair advantage in their economy.  I don’t want god mode cheats.  I don’t want world first titles.  I just want to play their game and enjoy it.

But when I play, I also want to win.

11 Comments

Filed under Battleground Strategies, Cynwise's Battlefield Manual

How DID They Win That Wintergrasp?

WG-Fail-Train.jpg

Anyone who spends a lot of time in Durotan’s Wintergrasp is familiar with the above sight. Sometimes, no matter what you do, the Horde is able to launch a massive assault on the west wall of Wintergrasp Fortress with 8-12 Siege Engines in the first 2 minutes of the game. If all Alliance defenders, and I mean ALL defenders, don’t rush out to the west and try to stop them, the mass of siege will break through and capture the fortress in under 6 minutes.

At that point, the QQ starts. “Cheaters!” “Hax!” are some of the kinder words thrown at the Horde. But, unlike exploiting the old bug that let you drive siege through walls, this is just smart thinking by the outnumbered side, using the mechanics of the game to fight an opponent who outnumbers them 2:1 (on a good day.) The Horde groups up their siege for one massive push that the defense cannot stop.

The key is a tactic that both sides should use, no matter who has numeric superiority.

  1. Focus your kills to rank a few players up to First Lieutenant.
  2. Have those players create Demolishers and Siege Engines at the Workshop, and then abandon them to go create more.
  3. Other players without rank man the abandoned vehicles and wait.
  4. Once all vehicle slots are filled, everyone goes together.

That’s it. That’s how you win an offensive Wintergrasp battle. Group all your siege together and shove it through the walls. Organization and discipline will win you Wintergrasp.

This tactic works nearly every time; the only counter is for a very strong defense to start attacking the group as it leaves the Workshop and keep going until it stops — if the defense waits for them to hit the first wall, it’s over.

Now, there’s a legitimate question of how can a side start creating Demolishers and Siege Engines within the first 15 seconds of the game. It’s tough to rank up to First Lieutenant — my personal best is after about 45 seconds, which meant I was creating Siege Engines at 1:30 into the game. But sides with Tenacity have it a little easier.

Tenacity increases the “kill value” of NPCs, making it easier to rank up. On an imbalanced server like Durotan, where 20 stacks of Tenacity are pretty much the norm, a single NPC kill will grant First Lieutenant rank. This gives your side heavy vehicles right away, and if you are organized and disciplined at the Workshop, you can create your Siege mass within a minute.

The more commonly QQed tactic, sometimes called the Wintergrasp Logout Exploit, is to have characters log out during an active Wintergrasp battle so they can log back in to another battle in progress with their previous rank. But with the advent of queuing for Wintergrasp, this exploit just doesn’t work. The buff is removed when you queue for the battle and your status is reset. This was never really the primary reason sides massed siege — consider the logistics between this and the Tenacity option — but it was possible, so people latched on to it.

So how did the other team get 12 heavy vehicles and take Wintergrasp in under 5 minutes? It wasn’t by cheating, or using exploits, or because Blizzard hates your faction. It was because the other side had Tenacity and was organized, disciplined, and executed a massive offensive push that your side didn’t defend adequately against.

It’s okay. Don’t take it too hard. The next battle, you’re on offense. Show ’em what you’ve got.

12 Comments

Filed under Battleground Strategies, Cynwise's Battlefield Manual