Arathi Basin provides a dynamic set of resurrection vectors. Bases can and will change hands throughout the fight, causing troops to scatter across the map in ways you’ll just have to adapt to. Unlike Warsong Gulch, it’s practically impossible to base an Arathi Basin strategy around Rez vectors. They are something to consider, to be sure, but are nowhere near as strategically important as in some other battlegrounds. You are better served by having a solid team which can take a flag quickly than try to engage in a protracted battle to force a rez vector.
That said, there’s one tactic which takes advantage of rez vectors in Arathi Basin – disrupting the initial flow of the battle and sending the opponent back to their spawn point. The spawn points (Trollbane Hall, Defiler’s Den) are substantially inferior graveyards in AB for two reasons:
There’s only one exit, not two, making it easier to farm.
They’re away from a node, so rez waves are not contributing to any flag’s defense.
The spawn points are bad places to be, so forcing your opponents there is good. If you can divide the other team so that some of them are resurrecting at the spawn point, while others are on the field of battle, you weaken them considerably. Whoever gets sent to the spawn point is effectively removed from the field of play for a minute or so, and their ability to influence events is curtailed dramatically.
Arathi Basin can be somewhat complicated to map out, so I’m going to use a sequence of topological maps to outline how this happens. The arrows do not represent movement, they represent resurrection vectors – where players should go if they happen to die.
In this scenario, the Alliance begins by sending 1 to ST, 7 to LM, 5 to BS, and 2 to Farm. The Horde sends 8 to BS, 3 to LM, 3 to GM, and 1 to FM.
The very first phase shows the Stables and Farm under assault but not yet captured. All resurrection vectors are pointing back to the spawn points; no matter how far away people are when they die, they will go back to their side of the map.
The skirmishes shape up to be:
ST, FM, GM, uncontested. Farm has 2 incoming.
BS: 8 Horde, 5 Alliance.
LM: 7 Alliance, 3 Horde.
We will assume, for the moment, that numbers prevail. This is not always a safe assumption, but this is Xs and Os.
This early stage is always so interesting to me because everything happens so fast as flags are assaulted. There will be casualties, but how many and from where is always totally up in the air. Stables and Farm are ticking but haven’t flipped as LM, GM and BS get assaulted, so all casualties go back to the spawn points.
The key to watch is Farm in this example. If the Alliance outriders can take it from the defender, they disrupt the graveyard flow of the Horde. It’s actually really important to hold ST and FM long enough to provide your team with a decent graveyard!
Let’s assume they succeed – no small assumption, I know – and see what happens.
Let’s assume total casualty rates at each base for the losing side, and some losses for the victorious side. The Horde at LM, FM and Alliance at BS are sent back to the spawn points. This is numerically worse for the Alliance (they lost more at BS) but they hold the strategic advantage at the Farm.
All rez vectors are still plausibly pointing back to the spawn points, but ST is about to flip.
Horde sends 2 from BS to ST. Alliance sends 3 from LM to reinforce FM.
Here’s where it starts getting interesting. I’m going to focus just on a few of the Horde rez vectors here, because once ST flips the blue team will all go there.
The Horde attacking ST are going to be in trouble. They are going to meet the rez wave coming out of Trollbane Hall and get steamrolled – but because there are no red graveyards yet, they’ll go all the way back across the map.
The Iron Triangle junction between LM, BS and FM is another place to watch. Farm will be under attack, there will be a lot of attention on it from the Horde. BS will split its defense, sending 2. The rez wave will come at it from the other side.
If the Alliance is smart or bloodthirsty, LM will send most of its troops to Farm to counter the BS reinforcements.
The key to notice is that the Horde is still sending all casualties away from a defensible node in this scenario.
Here’s the map about 30 seconds later, or around 1:45-2:00 into the battle. The second tier of nodes convert and the Horde finally gets some graveyards on the map.
The problem is now that they’re split across the map at the Farm. Almost half of their team has rez vectors pointing to the Defiler’s Den, while the rest are pointing to BS or GM. If the Alliance meets the rez wave on the GY side of Farm, they’ll keep sending the Horde back to the spawn point. The BS flag is pretty far away from the Farm, so the Horde really need to be near the Iron Triangle junction to be sent back to BS.
And if they do that, chances are pretty high that they’re not fighting at the flag, they’re fighting in the road.
This is a bad situation. If you are attacking from BS and get too close to the flag (like you should) but fail, you’ll get sent to the corner of the map to the spawn point. In that case more of your team will be moving out of the effective field of play to the edges, weakening BS further and further.
I see this split a lot. A fast counterassault on the Stables or Farm can really throw off a team’s rhythm and they won’t even know why – they just know that people aren’t getting the job done, that Farm/Stables is a problem point, can’t someone please take a base?
The split can be overcome, but it’s not easy. The people who got sent to the spawn points might have died because of overwhelming numbers, but they might also have died from getting outmatched. The attack vector out of the gate is somewhat weak (no cover, highly visible approach, easy for defenders to engage away from the flag.) There are times that being in the spawn point can work in your favor – if you have 3 people repeatedly rezzing there, and 5-8 opponents holding the node, those 3 players are creating a statistical imbalance elsewhere on the map by getting farmed.
This goes back to one of the important points about Arathi Basin – you have to win the individual matchups. AB rewards pure PvP play all over the map. If your team can’t take a base with a 1:1 matchup, then they’re going to lose no matter what kind of strategy you have.
FIGHTING IN THE ROAD
It happens to all of us. Sometimes you get jumped, sometimes you are trying to defend something, sometimes you just see red and stop thinking, and then … you’re fighting in the road.
Away from a base, away from a flag.
Keep in mind that fighting in the road can be a viable defensive strategy under the right conditions. If others are holding the base and staying at the flag, then killing the enemy out in the road doesn’t pose much risk, and your own death should put you back at the base in a reasonable amount of time to help defend. The attackers are intercepted well away from the flag and have no opportunity to assault the base.
However, for attackers it’s a pretty bad idea. You’ll get sent back to a base you control, you’re nowhere near the flag, and even if you defeat this defender, they’re going to show back up in 30 seconds at the base you’re assaulting.
Avoid it if you can on offense; the rez vectors don’t favor you.
This is the second post in my series on resurrection vectors and graveyard controls in Warcraft’s battlegrounds. I should just go ahead and admit that this is going to be a series; it is. I don’t have a catchy name for it yet, but why wait for a title? Let’s just dive right on in and talk about Arathi Basin.
The resurrection vectors of Arathi Basin are to the nearest controlled graveyard, including the original spawn point. These vectors have tactical implications for skirmishes at individual nodes and strategic importance when dealing with troop movement. In this post I’ll focus on the tactics at each node; we’ll talk about the Iron Triangle in the next one.
Control of the node’s flag gives your team control of the node’s graveyard. Each node starts off uncontrolled, but clicking on the flag assaults the base, turning the flag grey. The graveyards come into play one minute after the initial assault, when the node is captured and the flag turns blue or red. From this point on, they work like a standard graveyard with rez waves at the spirit healer.
Each node’s flags are on the other side of some object or building preventing the resurrection wave from knowing exactly what is happening at the flag while dead, and requiring them to run around the obstacle to get to the flag. There are thus two components to the local rez vector that have to be considered:
Casualties/reinforcements are blind to the situation at the flag; they don’t know if someone is assaulting it or not.
Defenders will always have at least two routes to return to the flag1. The route chosen will determine how quickly they get it back in sight, as well as which side of the offense they can attack.
Because defenders have to run a route to get back in sight of the flag, attackers have additional time to allow attackers to assault the base. These lines of sight are important!
The above diagram is a general representation of each node. You might have to flip the orientation a bit, or change the building shape and add in chickens or undead horses or something, but it’ll suffice for a discussion on graveyard control. The routes aren’t equal length to run, but it’s more important to get to where you can disrupt the attackers than necessarily get back to the flag.
From a tactical standpoint, the ideal placement for defense is near the flag to prevent capture, no matter where the attack comes from. Fight at the flag! is the rallying cry of introductory battleground manuals everywhere, but the real tactic is:
Establish a buffer zone between the flag and the attackers. Engage them away from the flag to deny them opportunities to assault the base.
Position so rez waves reinforce the flag first.
Creating this zone of control is important and takes practice. You don’t want to stack on top of the flag, but you don’t want to be too far away from it. Teams should get used to moving forward and engaging the enemy away from the flag without getting pulled off it.2
Furthermore, the direction reinforcements come will either help or hinder your flag defense. Having rez waves passing by the flag to get back into combat is far safer than having them never see the flag.
Let’s take a look at a flag-side assault.
Attacks on the flag side of the node generally put the defenders in a good position. They are able to watch the flag and have a few people cluster near it while sending DPS off to meet the assault at a moderate distance. Lines of sight are usually pretty clear on both sides, and rez waves know which direction they need to be heading to get to either the flag or to battle quickly.
Flag-side assaults are often slugfests and death matches.
A more interesting tactic is to assault the graveyard side directly, with the intent to both pull defenders away from the flag and neutralize rez waves quickly.
Attackers can (and should) use the resurrection vector at the node to their advantage by drawing defenders into this kind of fight. Pushing towards the graveyard:
Blocks line of sight to the flag for many defenders
Focuses attention away from the flag
Allows attacks on newly-resurrected characters, when they are unbuffed and unprepared
Establishing this kind of control allows attackers to really use the rez vector of the node against the defense. Remember, the whole point of using rez vectors is to send your opponents where they don’t want to be, where they will be ineffective. Hitting the GY side allows you do shift all defenders away from the flag.
Shifting defenders away from the flag means you’ve opened up the Ninja Zone. The reason that people like me yell FIGHT AT THE FLAG! so much is because if you’re not near the flag, not looking at the flag, not remembering that the flag is the really really most super important part of the entire node, then it’s open for the enemy to take. Ninja: doesn’t need to be a rogue!
One thing I like about Arathi Basin is how the resurrection vectors don’t dictate the entire battleground’s strategy. There are a lot of different ways to take a base. There are a lot of responses to which route you should take in which situation, depending on your class, role, and the position of your opponents. It’s not wrong to assault flag-side! There are plenty of ways that it can work – one of my favorite strategies is “ride in and kill everyone in sight, take the node before they rez.” Another one is “hit defenders with CC chains while standing/healing at the flag, click it often, steal the node while the defenders are still alive.”
But I also like that I have to ask questions like: where are the reinforcements going to come from? How long do I have before the next rez wave arrives? Am I getting pulled off the flag? Is it worth it to get pulled off a little bit?
I think it’s interesting how the answers change from battle to battle, from skirmish to skirmish.
Next time, I’ll zoom out a bit and look at the strategic uses of rez vectors and graveyard control in Arathi Basin.
—-
(1) Even the Gold Mine allows two ways to return to combat – the path down the mine, and the path to the mine roof. GM suffers a bit in that the second route doesn’t put you on a radically different attack vector; ideally, you could turn right after leaving the graveyard and approach the flag from the Stables side. ↑
(2) In an earlier post, PvP Playbook: Pulling Defenders Off Flags, I talked about how you can pull defenders off a flag just by letting them engage you at maximum distance – basically goading defenders to fight in the road. Don’t be that defender.↑
So here’s the situation: hordes of non-PvPers are going to be swarming the BGs next week trying for the School of Hard Knocks achievement. Their presence gives you the chance to work ok a lot of other battleground achievements. Helping both sides out can have unique benefits, as behavior in the BGs is going to be radically different during Children’s Week.
HELP THEM, HELP YOURSELF
Here are some examples of how helping people get the SoHK achievement can work towards your own PvP achievement hunt.
Warsong Gulch
The normal nice thing to do is to have one person go to the other flag room, see the opposing team dancing in there with their orphans out, pick up the flag and drop it, allowing everyone to return flags. (Returning a flag is when you click on a loose flag, sending it back to the flag room.)
If you are an experienced PvPer, you want to encourage this kind of behavior, because you can hang out and work on:
You also provide real defense to PvE players if the other team comes roaring in with no intention of playing nice.
Arathi Basin
Trading a node back and forth between sides can be beneficial for both parties. If you hang out by a blank node, dancing with your orphan out, you can hopefully signal the other team that you’re there to help them by defending the flag – allowing them to assault it over and over again.
The trick there is that you have to find someone willing to trade the node with you, which seems less common than in WSG.
Alterac Valley
Much like Arathi Basin, not everyone notices that you might be a friendly defender, willing to recap the tower and give the opposing team a turn. But if you find a group who won’t kill you on sight, you can work on:
I’ve found this one difficult in the past because not everyone realizes that a lone defender might be there to assist and then leave. But it’s worth a shot.
Eye of the Storm
Eye of the Storm is perhaps the toughest BG to help other players with. If you’re experienced with running the flag, you can take it from mid and run it for SoHK people, but you don’t get anything from doing so. You have to either cap the flag or kill the flag carrier to contribute to any achievements.
Your best bet to play nice is to watch and see if someone is trying to grief their own side – someone who takes the flag and hides away with it, refusing to cap, that sort of thing. (Refusing to cap is normally a legitimate tactic, but it’s a dick move during Children’s Week if you control mid.)
Note that you don’t have to return the flag – just kill the FC and it counts.
It’s your call whether to go after the opposing team’s FC for this achievement. Personally, I think you should, but if you’re feeling really nice you can let them go … while capping 4 nodes and working on Eye of the Storm Domination.
WINNING AT ALL COSTS
I think there’s a strong argument to be made for helping other players is more beneficial to chasing achievements this week than sticking to the rules of each BG. But if you insist on playing to win, you can still work on some achievements. Winning games is a good one – show people how to play the BG once the achievement hounds are finished. There are a few (like Stormtrooper) which can be done to help your team win.
The key to surviving Children’s Week is to keep a long-term perspective on your goals. Sure, you can get frustrated by all the under-geared achievement seekers.
But you can also look at this as an opportunity to make some headway on your own achievements.
I'm at your flag, stealing your base, because you got pulled away chasing my friends.
Ninja.
In PvE, being called a ninja is a bad thing, but in PvP, ninjas are awesome. Ninjas come in and steal objectives out from underneath the enemy’s noses. They snatch reinforcements away from a node and send them tumbling across the map.
Ninjas are awesome. But they often don’t work alone.
Let’s open up the playbook.
PULLING DEFENDERS OFF FLAGS
Every PvPer needs to learn this one. Unlike the DPS pick, this is one where you need to be able to read the situation at a node and take one of two roles – decoy or ninja.
Let’s start with a quick discussion on flag defense.
Effective flag defense requires defenders to be alert, pay attention to their surroundings, and be aware of several different avenues of potential attack. They have to be aware of their position relative to the flag, and try to make sure that they engage any attackers far enough away from the flag to deny them access to a potential cap, but close enough to interrupt any caps that get through.
My healing druid Cynli is defending the Blacksmith in the above picture. She’s moved out about as far as I’d consider safe and still defending. She could heal any DPS on the road or approach from Farm, but not quite reach the bridge. I’ve outlined the healing range with the green line so you can see it.
The red line represents how far back I can get with Hurricane, my main flag defense tool. I try to keep the flag within view when defending at all times with the camera angle, and have hotkeyed flipping my camera around to the delete button just so I can check behind me if the flag is not in view.
As a solo defender, this is as far as I should ever get away from a flag. Right now I have visibility only to the Farm and some of the LM road – I’m not defending against the GM or ST approaches, and parachutes from LM will probably land behind my field of vision.
Your goal is to draw me even further away.
THE DECOY AND THE NINJA
Every node could be broken down into a map like this one – where is the flag, where is the graveyard, where are the lines of sight?
Most nodes have an obstruction between the flag and the graveyard, and at least two avenues of approach. That’s deliberate – if you can’t see the situation at the flag while waiting to rez, you can’t call it out to your teammates. You might be able to see someone approaching the flag, but not from all approaches.
The goal of this play is to create a distraction away from the flag, so that the defenders leave it outside of their line of sight. This is one of the times where it’s okay to notfight at the flag, but one of the only ones.
The decoys pull the defenders away from the base by making a very obvious approach. They also pause at extreme range to allow defenders a chance to 1) notice them and 2) engage them. When fighting, they pull back a bit instead of going forward.
Once the DPS are pulled away, the healers will likely follow. This is something that personally frustrates me as a healer, watching DPS tunnel vision their targets and going over the BS bridge. They’re out of range, and if I’m the solo defender, the right thing for me to do is stay right where I am.
But sometimes, even a wary defender can get pulled out of position without even realizing it. That’s what a good decoy attack should do. They should be loud, they should be inviting targets, they should look like a credible threat – or healers who have to die.
Whatever bait works, use it.
While the decoys are drawing attention away from the flag, the ninja comes in from the opposite approach. Now, it’s great if you have a stealther who can do this, but it’s not necessary at all. I think a lot of players think that they can’t ninja cap flags if they can’t stealth, and that’s just not true. It is all line of sight. In the above example, a rider coming up from the GM road may be seen from the BS graveyard, but it’s not really all that likely. If you approach from the water or parachute in from LM, you’re completely invisible to the defenders.
Use the buildings. Use the terrain. Check to see that the decoys have pulled the defenders away, and then cap that flag.
The key here is patience and communication. If you see someone on your map coming around behind a node, call out what you are doing – pulling defense off the flag – and tell them to get the flag. If you see someone pulling defense away, go in and grab it. You can even rush in past the decoys and get the flag, but your team has to know that they should switch to snares, slows, and do whatever they can to keep defenders away from you.
Every node is a little different in Arathi Basin, Battle for Gilneas, and even Eye of the Storm. This also applies to towers and bunkers in Alterac Valley, though with restricted lines of sight.
Every class can ninja cap, and every class can serve as a decoy for a ninja. All you have to do is get the defenders focused on one group of you, while another goes in and steals their node out from under them.
Cataclysm Patch 4.2 introduced several undocumented changes to the reputation system in Warcraft. Some were quite welcome: city tabards now worked in Burning Crusade dungeons, allowing alts going from 60-70 to keep gaining home city reputation while running LFR. Others were less welcome: dungeon bosses gave less reputation in general.
The biggest change for battleground enthusiasts, however, was in Arathi Basin and the reputation awards for the League of Arathor and the Defilers.
Before 4.2, you got 100 reputation per win (10 reputation per 160 resources).
After 4.2, you get 60 reputation per win (10 reputation per 260 resources).
Yes, that’s a 40% nerf, and is before guild perks or Diplomacy bonuses are factored in.
Exalted with any faction requires 42,000 reputation points. To get Exalted with the Arathi Basin factions before 4.2, this required, in the best case, 420 wins. More realistically, that’s probably around 600 games, as you still gain experience from losing as long as you get some resources on the board.
After the 4.2 changes – and as this has never been confirmed as a bug, we have to assume that it was a deliberate change – Exalted requires 700 wins, or probably around 1,000 games total.
One thousand matches to Exalted. At 20 minutes a game, that’s 13.9 days /played in Arathi Basin.
Warsong Gulch isn’t really any better, but it didn’t change during 4.2. It’s been bad for a while. At 35 rep per flag capture, you’re looking at 1200 flag caps, or a minimum of 400 three cap games. Since you can win with a single flag cap, and can lose without any flag caps, you’re more likely looking at 600-700 matches to Exalted.
Does this seem like good design?
CONTENT THAT GETS PROGRESSIVELY HARDER
The 4.2 Arathi Basin reputation nerf is actually not the first time that PvP reputation has been nerfed – these reputations used to be far, far easier to grind, and the Justicar/Conqueror titles (Exalted in Warsong Gulch, Arathi Basin, and Alterac Valley) were much more in reach.
Back in the old days, Marks of Honor – remember those? – could be turned in to the appropriate quartermaster for reputation (3 Marks for 50 rep), shortening the grind considerably. Before Wrath of the Lich King, you needed far fewer victories to reach Exalted:
Warsong Gulch: 273 wins
Arathi Basin: 280 wins
Alterac Valley: 70 wins
Let that sink in a bit. Getting to Exalted takes 127 more WSG and 420 more AB victories than it did now than it did in Burning Crusade. That’s victories – I figure you’ll have to play 30-40% more games total to do it. If you’re in a guild with the reputation perk when you start and all the way through, you can shave 10% off.
No analysis would be complete without looking at some of the other changes that have taken place to these battlegrounds:
Warsong Gulch now has a timer, which limits the amount of time each battle can take, so 40 mins – 1 hour long matches are no longer the norm. Unfortunately, this timer also means that each victory can be earned with a single cap, making the rep gain wildly variable. It’s pretty much a wash.
Arathi Basin was reduced from 2000 resources to 1600, which means each victory awards fewer reputation points. The rate of gain, however, has remained unchanged before 4.2.
The resource gain reduction in Arathi Basin is partly responsible for the increase in the number of games required to play to get to Exalted. The rate of reward wasn’t substantially modified until 4.2, though, so while we can say that it’s not quite as bad as the numbers say, it’s still bad.
It’s still about a thousand games to Exalted with the League of Arathor and the Defilers.
I guess they’re really hard to impress.
IMPROVING REPUTATION IN BATTLEGROUNDS
This is what content that gets progressively harder looks like. And it’s honestly not all that much fun. If you started playing in 2005, this was difficult but doable. If you’re starting now, in 2012, this is brutal.
Is this a good game design? Is it good to have a goal like this, one that is so far out there that you really have to focus on a single character for years to get it?
Yes, for years. Let’s say you are a relatively casual player and can play 3-4 AB battles a night (2 hours with queue times). You better keep up that pace for 286 days.
Nothing but Arathi Basin. No Arena. No PvE.
Just AB. BS, LM, ST. No, go GM. LM inc 3. Go Farm. GO FARM. BS going. BS gone.
I’ve played about 300 Arathi Basins across my different characters in the past 3 years. Cynwise has the Veteran achievement there. I know the place pretty darn well at this point, and I haven’t even scratched the reputation post. She’s 9796/12000 Honored. Yikes.
I don’t mean for it to sound like I’m complaining, because at this point I’ve totally given up on this as a reasonable goal for me. I’m not getting it. It’s not worth it to me.
But contrast AB reputation to Alterac Valley reputation, which most people get Exalted around 80-100 victories in. I have two characters at Exalted there, another two at Revered, and most of the others are making great progress. Some of this is due to factional imbalance in the old battlegroups, but it’s also due to the amount of reputation awarded.
This kind of reputation grind – one that requires commitment, but is doable on your way to the Veteran (100 victories) achievement, feels more realistic. Let’s face it, after you’ve won 50 battles, you feel like you’ve gotten the hang of it. By 75, the NPCs should know your name when you zone in.
All three of the original battlegrounds have reputation, and they are all tied into specific objectives within those battlegrounds. This has benefits – you gain rep for doing the stuff in the BG – but it also has drawbacks, as we see here. The scale is so out of whack now that changes need to be made to WSG and AB to make their grinds relevant again – otherwise people will simply look at them and go, that’s not worth it, and it fails to have any value.
Just like now.
These tasks are supposed to be hard, not impossible.
(There’s also the issue of lingering resentment caused by increasing the difficulty on a task over time, but that’s a different post.)
My opinion is that the reputations need to be scaled to a number of games or victories. That’s how we evaluate these grinds, after all, and that the huge disparity between AV and AB points out that one can be done on multiple toons, while the other is an all-or-nothing deal. Personally, I like the 75-125 win mark – it’s an investment, but given the number of battlegrounds out there, it’s not unreachable. It still allows you to play other battlegrounds without feeling guilty. You could make an argument that it should be easier – 50 – or harder – 200 or 250 – and I’d go, okay, at least we’re in a ballpark. Personally, with the number of other things to do in the game, I lean towards a lower number. But settle on some number of victories/matches and base your rewards off of that figure.
Also, standardize reputations and rewards in battlegrounds. It baffles me why the Isle of Conquest has a tabard for the Master of Isle of Conquest achievement, AV/AB/WSG have them for Exalted reputations, and EotS, Strand, BfG and TP completely lack them. I’m not crazy about the IoC model – I don’t really like Battleground Achievements that aren’t “Win” and “Win More” and “Win ALL THE GAMES,” but it’s at least a viable, consistent model that could be used.
The gear rewards from leveling should also be adjusted to reflect the new brackets and early introduction of several battlegrounds (Eye of the Storm, I’m looking at you), but that goes without saying.
Consider extending the BG reputation system to PvE and Arenas. I like this option least of all, but I think it needs to be put out there – the way it works now is really bad. Arathi Basin and Warsong Gulch are arguably the two worst rep grinds in the game. Tabards that could be worn while questing, dungeons, or – best of all – in Arenas and Rated PvP – would allow people to grind while doing other stuff.
If you could Arena in the name of the League of Arathor, would you? (I bet you would. I’m not wild about raiding/dungeons for PvP rep, but it’s something to consider as well.
I actually think a piecemeal approach to fixing reputation systems is harmful, and that the battleground reps need to be considered as part of the entire reputation system. Reputation tabards are an interesting idea, but wouldn’t it be simpler to code the game to award X amount of tabard rep per Y thing done (mob killed, boss killed, BG/Arena won), then check the tabard and award it appropriately? I know I’m falling into the non-programmer fallacy of “it sounds logically simpler, so it should be simpler to code,” but… I have been a professional programmer, and it actually is simpler to code up one system than a bunch of disparate other systems. It’s harder to yank bad code out and make sure things work right after the fact, but … I’ll stop.
One of the things Blizzard mentioned they wanted to work on in Mists was WoW’s reputation systems.
I hope when they do so, they take a long look at the BG reputations and make them a more accessible part of the game.
Because tasks that get progressively harder as the game ages?
Patch 4.1 is going to bring some substantial changes to battlegrounds. The patch notes are up in a relatively final format, so I finally feel comfortable talking about them.
Let’s take a look.
HONOR GAINS DOUBLED
The rate at which Honor Points are earned has been doubled.
Thank goodness for this change. When the new system debuted at in 4.0.1, we assumed that the reason Honor was so hard to grind was because we weren’t at 85. Once we hit 85, it became clear that no, it just took a lot of time to get gear.
Then Tol Barad happened, and … well… let’s just say that if you got gear during that week, your grind was short, and if not, it was long. It felt about as tough as the grind in mid-Wrath, before Blizzard adjusted it to take as much time as gearing up for Heroics.
This will be good for PvPers gearing up. It may have unintended side effects when combined with the new Justice Point conversions, however. We’ll have to see how it works.
Speaking of conversions…
PvP AND PvE POINT CONVERSIONS
Conquest Points are now purchasable from the Valor Quartermasters at 250 Conquest Points per 250 Valor Points.
Honor Points are now purchasable from the Justice Trade Goods vendors at 250 Honor Points per 375 Justice Points.
Justice Points are now purchasable from the Honor Trade Goods vendors at 250 Justice Points per 375 Honor Points.
I’ve written about this change at some length before. Good? Bad? Tough to say until we see how the Honor and Justice gains pan out; my guess is that regular Battlegrounds will be a great way to get DPS into Justice Gear.
FOCUSED/BRUTAL ASSAULT
This change is aimed at Flag Carriers in WSG and Twin Peaks, and is going to make their jobs more difficult with the aim of shortening games.
After 3 minutes of both teams having the flag, both flag carriers will get Focused Assault, which increases damage taken by 10%.
Every minute afterward, an additional stack will be applied to increase damage taken by an additional 10%.
After 7 minutes, Brutal Assault will be applied in place of Focused Assault. In additional to the damage debuff, this debuff also caps the player’s movement speed at 100%. The damage taken debuff works the same and will add 10% to the debuff up to a maximum of 100% damage taken.
My take on this is that it is directed entirely at rated battleground matches, in an attempt to make the matches move faster. A good FC/2-healer team can keep themselves alive for some time, which prolongs the match. Most of the changes we’ll see to battlegrounds have this theme – make it easier to attack, harder to defend. This will have interesting implications in all brackets.
It also is a direct blow to Druid FCs, as their speed in Travel Form helps them be superior flag carriers compared to other classes. Damage Avoidance will now be key, so expect to see Blood DKs and Prot Warriors as FCs even more often.
10 v 10 ARATHI BASIN
Arathi Basin is now available as a 10v10-player rated Battleground.
While this is going to be weird, it’s necessary to add some variety to rated play. Right now there are two CTF maps and one Resource map; this adds in a second Resource map. With the loss of the 15s, there needs to be more variety in Rated Battlegrounds, and this helps quickly add AB back into play.
FASTER FLAG CAPS IN AB/BfG
Flags should now cap in 7 seconds, down from 8.
This is another rated change. By taking a second off of the cap timer, bases should flip a little more often, which would invoke new graveyard conditions and resurrection vectors, making for a more dynamic game.
GRAVEYARD CHANGES: BATTLE FOR GILNEAS
Players who die at a control point that they own will now be teleported to the next closest graveyard, instead of the one at which they died.
If a player’s team owns the Mine and Waterworks, and dies at Waterworks, they will be teleported to the Mine.
If an Alliance player’s team only owns Lighthouse, and dies at Lighthouse, they will respawn at their base.
If a Horde player’s team owns Waterworks and Mine, and dies at Lighthouse, they will respawn at Waterworks.
The simple summary is: you will always be sent away from the base you die at, no matter if you control it.
This is a substantial change to make this battleground more dynamic, designed to make node defense more difficult by sending the defenders away from the node (just like the attackers), allowing a larger attacking force to actually overwhelm a node, instead of having the resurrection wave of the defenders keep them up.
Look at the example they used above:
This is a departure from the Arathi Basin paradigm, where you resurrect near the node you are defending. Attackers will still need to fight at the flag, but defenders will need to coordinate reinforcements between nodes. Instead of stationary teams, you’ll have to constantly replenish each base’s forces.
In some ways, this is an anti-healer change. Stationing a dedicated healer at each node in the current design allows a defending force to keep the base. This change will send the healer away from the base, allowing the attackers more time to kill the defending DPS. Right now killing a healer only gives them a window of about 15-45 seconds to burn as many people down as they can, and that’s not much of a window.
I have a few questions about how the resurrection vectors will work in certain cases (what if Alliance controls Mine but not LH or WW, for instance? Do they go back to the spawn point?) but will have to see how this shakes out.
Keep in mind non-rated play will be affected, just like rated matches, so coordination of team strength in a PuG will be key to success.
GRAVEYARD CHANGES: TWIN PEAKS
More changes to the graveyards and resurrection vectors, courtesy of rated battlegrounds:
Players will now only spawn at their base graveyard when they die in the enemy base.
Defending players will respawn at the middle graveyard.
Midfield players will respawn at the middle graveyard.
Attacking players will respawn at their base graveyard.
This is an interesting change.
First, it’s interesting because it reminds me that I still haven’t finished my guide to Twin Peaks, but I’m seriously lacking the motivation to do WSG 2.0 when WSG 1.0 is still so interesting!
Also, it’s interesting because it’s very deliberately making it harder to defend your base and the FC. No longer do defenders go back to the base graveyard, instead they move up to midfield. Balancing that change, however, is a huge penalty to attackers – getting sent entirely across the map, instead of rezzing at midfield.
Here’s a quick and dirty diagram of how it will work:
There are two problems these changes are trying to solve.
Defenders, and by defenders I mean defending healers, currently can get back into the base, and back to the FC, very quickly. This change will make it easier to take down the FC.
Sending attackers back to midfield was an insufficient penalty, allowing a team that focused heavily on offense to weight the field towards the enemy base, causing a turtle. (Defenders would rez by base, offense maintains pressure to keep them there.) This change makes the field more dynamic.
Frankly, this is going to mean more fights in midfield, which given some of the TP turtles I’ve seen, might not be a bad thing. This fits in very strongly with the anti-defense theme we’re seeing in this patch, which might make rated battlegrounds more exciting – but it also might be like introducing nets to football.
One item of note – I don’t see anything about fixes to the Leap of Faith exploit some people have reported in Twin Peaks. (Priest dies, rezzes, pulls FC up to GY, FC can’t be killed.) Hopefully that will be addressed in this patch, too.
GRAVEYARD CHANGES: WARSONG GULCH
This is the graveyard change that will have the greatest impact on players, as WSG is available at level 10, while Twin Peaks and Battle For Gilneas only open up at 85.
The graveyards outside both bases have been lowered in elevation and are no longer on the same plane as the main flag room entrances to either respective base.
When this change was originally announced, there was uproar because of the context in which it was presented – as an anti-camping change. It’s not. If anything, it will make graveyard camping easier, not harder.
No, this is purely a change for rated battleground play, and it’s the first change where rated play is going to dramatically impact non-rated play, including leveling characters. Let’s take a look.
This is how the Warsong Gulch graveyard currently operates.
The GY is on the same level as the main structure, which allows for numerous vectors when characters resurrect. They can rush to the flag room to assist with defense (about 15 seconds), they can assist with graveyard defense (immediate), they can go to the balcony (about 18 seconds), or they can leap down to midfield.
The proposed changes moves the GY down onto its own level, like so:
This change eliminates a number of options from the GY, most notably going directly back to the flag room. Resurrecting characters will be unable to get back into the base without going down to midfield and then running around to the tunnel or ramp entrances.
I hate to say it, but this change is really targeted at healers in rated battlegrounds. Rated BGs should have 2-3 healers, and with the current layout, healers are only out of a FR defense for about 30-45 seconds. This change is to open the window of opportunity for the attackers to take down the FC once the healers are gone.
As for ganking? Well, this change actually makes it easier to camp the enemy graveyard, especially with multiple healers:
Place your ranged up top, your melee down below, and your healers out of range of the GY. Once in position, your healers are essentially untouchable, and your DPS can grind the opposing team until they give up. Contrast that with the current layout, where you can directly engage your attackers if they are on the same level, or retreat out of range of ranged attackers firing through the hill below you.
Don’t believe the hype. This change is not about graveyard camping.
This is the first change made for Rated PvP where I think it’s going to have a negative effect upon the non-rated battlegrounds, especially leveling battlegrounds. It takes away the strategic depth of the Graveyard and limits player choices to essentially two routes – back up the tunnel, or out into midfield on offense. The lowest, non-mounted brackets will find this a real challenge to get back to the flag room, which can often mean the difference between a cap and no cap when everyone runs at the same speed (except Druids and Shamans.)
I’m not saying this change shouldn’t be made; I don’t play enough rated battlegrounds to know if they’re too defensive right now or not.
But this is going to have impacts on lowbie PvP that might – and I stress might – make WSG a lot less fun to play. We’ll have to see.
RESILIENCE SCALING CHANGES
Resilience scaling has been modified for linear returns, as opposed to increasing returns. Under the new formula, going from 30 resilience to 40 resilience gives players the same increase to survivability as going from 0 to 10. Resilience now scales in the same way armor and magic resistances do. A player with 32.5% damage reduction from resilience in 4.0.6 should see their damage reduction unchanged in 4.1. Those with less than 32.5% will gain slightly. Those with more will lose some damage reduction, increasingly so as their resilience climbs.
I’ve posted on this before, as well – the stat will change so that the effect of the stat becomes linear, instead of the stat. Oh, just go read the post. 🙂
Overall this is a positive change. This will improve the survivability of people with lower Resilience ratings. That first piece of PvP gear should feel like it matters. Improving survivability early on while gearing will be a very good thing.
The higher levels of Resilience will be less effective, though, but again – that’s probably a good thing. Too much Resilience can go to your head.
BC enchants which require an item level of 35 will now also require a character level of 25. (This removes the +15 Resilience, +6 Stats and +150 Health enchants from the 10-24 brackets.)
Several items, like the Haliscan Jacket, have had their item levels lowered, so they can’t take BC enchants anymore.
Wrath enchants will now require a minimum level of 50. This impacts the 49 bracket significantly.
Netherweave bandages and higher will have level requirements.
MP5 enchants have been converted into Spirit enchants.
HP5 enchants have been converted into Stamina enchants.
Most of these changes will actually make it a little easier to make a new twink, removing the effectiveness of some of the grandfathered items. While I’m a little disappointed I can’t bust out my Inferno Robe with +150 Health on Cynderblock anymore, I’ll get over it.
There are a host of achievement changes in 4.1, mostly tuning and bugfixes. PvP trinkets and Every Man For Himself will get a new spell effect, Escape Artist is no longer sharing a cooldown.
But the changes above are substantial enough. The smaller battlegrounds are starting to feel the effects of rated play, and we may see more changes coming to other old favorites soon because of it. This is new territory for battlegrounds, which means it’s a little scary and exciting all mixed together.
I took the above picture after exploiting a bug in the walls of Stormwind that allows you to break out of the model and fall underneath the city. It’s actually really cool, if offering little or no tactical advantage – you run around on a big plane with the city half-formed above you. You can explore the hills above Stormwind Harbor, run all the way to the Burning Steppes, and fall through holes in the floor to special locations within Stormwind, like the Wizard’s Sanctum, above. (If you place a Demonic Circle on the ground before jumping, you can teleport back under the city when you’re done!)
Wall bugs and exploration exploits like this are harmless. If you’re Horde and you really want to use this place to summon a raid to attack Stormwind, you can – but it’s definitely easier to use someplace even less travelled like Cutthroat Alley or a building in the Dwarven District or the Park, since your summoned underground raid has to exit by the Docks anyways. (Seriously, when was the last time you needed to go to the Park as Alliance?) This is just an exploration bug, one that appeals to our innate curiosity. I got down under the city, looked around, got some screenshots, and left satisfied. No harm, no foul.
Exploits that confer advantages, though… Those are different. I’ve written about Battleground Exploits before, and I don’t think my position has changed all that much. As long as the putative exploit is open to everyone in a PvP environment, I’m pretty okay with it. But when it’s not open to everyone, when it clearly favors one side over the other…
Well, that’s when I call foul. And I’m calling foul now on Arathi Basin.
It is possible for Alliance characters, and only Alliance characters, to exit the preparation area and capture bases in Arathi Basin before the match begins. This is different from the Eye of the Storm exploit which allows players to exit the claustrophobic bubble, because players can’t leave the floating rock even if they get out of the bubble. No, you can have bases under your control before you even begin.
In a recent AB, we were 3-0 before the gates even opened. And that was patently unfair.
A single person can transform the starting map from this, to this:
That’s what a single player with the right abilities can do if they move quickly – have one (or two, if they get to LM really fast) graveyards under Alliance control and 3 flags already collecting resources, with a fourth about to fall. A coordinated Alliance group can 5 cap the entire battleground before the Horde reaches their first flag.
This is blatantly unfair to Horde players. And it needs to be fixed, soon.
It’s one thing if an exploit is something that both sides can engage in. It’s not great, and should still be fixed, but at least I can justify it as something everyone should do to level the playing field until Blizzard fixes it. But as far as I know, it’s impossible for Horde players to leave the starting area early. The geography and layout of the Horde area prevent it.
I’m not going to go into details about how this exploit works. The knowledge is already spreading in the wild, and the people engaged in it are happy to discuss it.
But it’s your responsibility as a player to not do it. There’s no defense here, no gray area. This is an exploit.
I see two simple changes to hot-fix it:
Change the layout of the Alliance starting area, expanding the area enclosed by the fence to prevent players from leaving.
Eliminate the ability to cast certain spells during the preparation phase, much like was done to Strand of the Ancients and Water Walking.
(Simple in concept, if not in execution. I work in IT and know that software problems are often more complicated than they seem.)
Changes have been made to Arathi Basin’s geography before — the outhouse that let you climb on to the roof of the Stables was removed in one patch, and the terrain changed to make running leaps onto the roof impossible — so the first option is possible to do. The second option is more of a bandaid fix, but one within an existing framework.
I like winning. I really like winning. But I don’t like winning like this. If you see this in action, make sure you file a GM ticket reporting the person who did it. You don’t need to cheat to win.
The Battlegrounds are probably the liveliest places in Azeroth right now, with lots of bored players rediscovering the joys of PvP while waiting for Cataclysm to hit. Stuff like this ruins their enjoyment and gives battleground enthusiasts a bad name – no matter which side you’re playing on.
We’ve got a maintenance going on right now. I hope it includes a fix to this exploit.
The [School of Hard Knocks] is a relatively straightforward Children’s Week holiday achievement: perform 4 tasks in the battlegrounds of Azeroth while your impressionable orphan ward is watching. Welcome to the World of Warcraft, kid!
This is also the holiday achievement that causes the most stress to non-PvPers. I don’t think I’m exaggerating when I say it’s the most hated achievement in the entire What A Long, Strange Trip It’s Been meta-achievement – hated more passionately than all the RNG-dependent ones, or any of the other achievements which brings players into the battlegrounds. It is hated because it’s the only achievement in the series that requires you to complete battleground objectives during a fight. You have to play the battlegrounds to complete it.
If you don’t PvP, I completely understand how intimidating this can be. The School of Hard Knocks takes you into an unfamilliar activity which you don’t like doing and asks you to compete against your fellow teammates while other players actively try to kill you. The environment is strange, your teammates may vocally resent your presence, and you are competing with other achievement seekers for the same goal.
When you put it that way, School of Hard Knocks can seem like a nightmare.
But you can do it.
I’m not going to patronize you and say “oh, this is easy!” The School of Hard Knocks is not easy if you don’t know what you’re doing. Heck, it’s not trivial even if you do know what you’re doing! It takes a good attitude, preparation, research, and a willingness to fail. Sometimes, to fail repeatedly.
But with planning and perseverance, you can get the job done and impress the heck out of your orphan. And yourself, too.
Ready? Let’s begin.
THE MOST IMPORTANT THING
The most important thing about this achievement is to ALWAYS have your orphan out when in the battlegrounds. Put the orphan whistle on your action bars and make sure that orphan sees everything. You don’t want to accomplish a goal and then discover you forgot to summon your orphan, and got no credit as a consequence.
BATTLEGROUND BASICS
Behind every die-hard PvPer there was once a new player who stumbled around the battlegrounds, blinking in total confusion. Don’t let any of the nerdrage you hear in /bg convince you otherwise — it’s okay to not know what you’re doing when you first zone in. It takes at least a few runs for the map and objectives to make sense, and a few more before you can really start contributing to a battleground.
So my first suggestion is to visit the battlegrounds before the Children’s Week holiday begins and scout them out. Don’t worry about accomplishing anything, don’t fight if you don’t want to, but get in there and figure out where things are. Where is the flag in Eye of the Storm? How does flag running and flag returns work in Warsong Gulch? Where are the towers and bunkers in Alterac Valley, and how do I climb up them?
If you take nothing else away from this post, please take this advice. Get familiar with the battlegrounds before you are under pressure to do something with them. While videos can help, there is no substitute for having run your virtual self over the course, so when the time comes and you are actually competing with others to finish, you will already have the edge of knowing what to do.
The second basic suggestion is to come to terms with dying in a battleground. I’ve seen some excellent PvE players really struggle with this; it can be a very personal hurdle for some to overcome. If you are used to raiding, where death means someone (sometimes you) failed to do their job correctly, the frequency of PvP death can be not only alarming, but a personal indictment of failure. It’s not.
PvP deaths aren’t personal. Sometimes – often, even – there was nothing you could do about it. Shrug it off and move on. There’s no repair bill, there’s no xp penalty, just a loss of buffs and a 30 second timeout. Learn from it, yes – but don’t let it get you down.
I’m passably good at PvP, and I die a lot. Like, an average of 12 times a day. Don’t sweat death.
My third suggestion is that you don’t need gimmicks to complete this achievement. You don’t need a premade or collusion with the opposite faction in order to do these achievements. Really, you don’t. Stories of dancing flagrooms and coordinated tower recaps are all well and good, but they’re gimmicks.
What you do need is planning and perseverance. Don’t give up. Keep trying. You can do this.
Let’s go take a look at the individual battlegrounds to show you how.
ARATHI BASIN: ASSAULT A FLAG
Arathi Basin is an easy one to start with. Each node has a clickable flag at it that represents control of the node. If the flag is gray with no logo, the node is unclaimed, gray with a logo, the node has been assaulted and will be claimed soon, and a colored flag indicates the node is controlled.
Your goal is to find either an unclaimed node, or a node that the other faction has assaulted or controls, and click on the flag. Assaulting the flag is an 8 second channel, so you can be interrupted by defenders.
The simplest way to assault a flag is to ride to the closest node – Stables for Alliance, Farm for Horde – and capture that flag. This often involves competing with several other players during a normal battle, and doubly so during Children’s Week, so it involves some fast reflexes and planning.
If the competition at the closest node is too much, ditch to one of the side nodes – Lumber Mill or Gold Mine. If you’re consistently losing at Stables/Farm, stop trying for them and go for LM/GM immediately instead. Depending on the opponent’s strategy, you may encounter no resistance at all in the first rush.
Finally, if you lose out at the two side nodes, you can ride straight to the node closest to the enemy’s base – Alliance go to Farm, Horde go to Stables – and try to capture that.
If you fail in the inital rush, don’t give up. Nodes change hands all the time in Arathi Basin, so you will have plenty of chances to assault bases. Use the map to scout out which bases are under enemy control, then look for ones that are lightly defended. (Or not defended at all!) Stick with others, don’t pick a fight in the road, stay and defend nodes that are taken.
The one place I don’t recommend you go for the achievement (at least not if you don’t like PvP) is the Blacksmith. Let me repeat that: do not go for the Blacksmith if you are at all PvP averse. The BS is seen as the critical node for most Arathi Basin strategies, so it is usually hotly contested throughout the match.
Here’s a map of Arathi Basin, with your target’s priority noted for both Horde (in red) and Alliance (in blue).
So for the Horde, it’s Farm -> Lumber Mill / Gold Mine -> Stables -> Blacksmith. For Alliance, it’s Stables -> Lumber Mill / Gold Mine -> Farm -> Blacksmith.
There are a few tricks that can help you rush a flag. Mount and start running against the gate before it opens. Aim at the flag but be near the center when the gate opens to get out quickly. When you approach the flag, have your mouse free for clicking – I switch to keyboard driving in those last few seconds. And spam your clicks until the channel starts! Don’t just click once.
Here’s a video with an example of Alliance taking Stables (the easy way) and Farm (the harder way.)
Ride hard and click fast!
ALTERAC VALLEY: ASSAULT A TOWER
So now that you know how to assault a node in Arathi Basin, it’s time to move on to the frozen battlefield of Alterac Valley.
Your job is to assault one of the four towers or bunkers before anyone else gets there first. The towers (and bunkers, I use them interchangeably) have flags at their top level that need to be clicked. The towers do not change ownership like nodes in Arathi Basin; instead, once they have spent 4 minutes being contested, the towers are destroyed. They can be defended before they are destroyed, which allows the possibility of trading assaults, but in most battles this just doesn’t happen. You should proceed with the idea that you have 4 shots to assault a tower each AV, and after that it’s time to farm honor. So be ready to run AV a few times before you get the achievement credit.
There are four towers: two on the far side of the Field of Strife (a large open plain in the center of the map), and two clustered near the enemy leader at the far end of the map.
If you are Alliance, you will start at the top of the map and need to ride south to reach Iceblood Tower (blue 1), Tower Point (2), and the two Frostwolf Towers (3). Horde start at the south end of the map and ride north to Stonehearth Bunker (red 1), Icewing Bunker (2), and the two Dun Baldar Bunkers (3).
The location of the towers dictates the three strategies you can adopt.
Closest tower first, then rollover. Ride hard to the closest tower (1: Iceblood Tower/Stonehearth Bunker) and try to get it first. If it’s taken, move to the next (2), then the final two (3). This method has a lot of competition but has some resiliency built in – you give yourself 4 chances, and you might get lucky on any given one of them. The drawback is that your chances on the subsequent tries are lowered because of the time you spent at the previous towers.
Ride straight to the second tower (2: Tower Point/Icewing Bunker) and capture it, ride on to the end if you fail. I like this option because it has less competition than the closest tower, but only delays you a little on your way to the final two targets. The delay is less because these two towers are along your riding path to the enemy base, while the closest ones are not.
Ride straight to the enemy fortress and capture the towers (3) there. I like this option a lot, but you have to know your route well and be able to check the map to see where your competition is not. You have to choose your target as you leave the bottlenecks (3: East/West Frostwolf Towers, North/South Dun Baldar Bunkers) and you only get one shot. There is no recovery if you choose wrong; you have to try again next battle. So while it’s risky, it also has a very good chance of success.
No matter which method you choose, there are some preparations you should make.
First, practice getting up the tower stairs. Horde have it a little easier here, as bunkers are less dizzying than towers to climb quickly, but both sides need to practice.
Second, running speed is everything. Make sure you have speed enchants on your boots and Swiftness potions on hand – and practice climbing towers with both active! Unlike AB, where most movement is mounted, AV assaults have an unmounted component so speed boosts will help. (Dont forget to practice with the speed boosts active, or you will launch yourself off the stairs.)
Third, practice running the map. See where people go in the pack to find all the little tricks of terrain that confer an advantage, and use them! Your goal is speed, and lots of it. Every second counts. I’ve included some videos below to show some of them, but there is nothing like practicing yourself.
Fourth, practice fast mounting out of the cave. Unlike AB or EotS, you can’t start mounted. You need to move slightly out of the cave and start mounting. That initial mount will either put you at the head of the pack (and in a good position for the nearest tower) or the middle (better to go longer.) The way to do this well is run just past where the rock ends and the normal ground begins and mount up.
Alterac Valley is big. REALLY big. And it has an asymmetrical map — the Horde and Alliance have very different experiences in AV — so I went ahead and recorded two videos to help familiarize you with the terrain and show how this all works in practice, one from each faction’s perspective.
Here’s an Alliance-side tour:
And here’s the Horde-side tour:
Alterac Valley can be a lot of fun, but with 39 other players shooting for 4 towers, this task is a bit more challenging than Arathi Basin. But it’s still pretty easy compared to the next two.
On to Outland and Eye of the Storm.
EYE OF THE STORM: CAPTURE THE FLAG
Eye of the Storm is a mixture of Warsong Gulch and Arathi Basin, with four bases (one on each corner) and a flag in the middle. Your job, should you choose to accept it, is to take that flag and capture it at one of the bases your side controls. You control a base by having enough people of your faction hang around there long enough to capture it.
If you’ve never been here before, the map is straightforward:
The black squares are the 4 nodes you can control: Mage Tower, Fel Reaver Ruin, Blood Elf Tower, and Draenei Ruins. The white circle is the flag in the center of the battleground.
There are really only two ways to get this achievement.
Grab the flag yourself and run it to the base. This is pretty straightforward, if somewhat hectic.
Guard a base, have someone else on your team grab the flag and run it to you, but you capture the flag. This requires you to communicate with your teammates, and for them to cooperate with you. The runner takes the flag almost to the base you control and drops it; you pick it up and capture it.
The first method is relatively straightforward. Go to the middle of the map, fight off the enemy, and grab the flag as soon as it spawns. Then run like the wind to the nearest friendly base you control.
The second method relies more upon your powers of persuasion. Let people know in BG chat that you are here for the achievement, and that you want to cap the flag but would rather defend a base. Ask if flag runners will let you cap it. Many will. Whisper them when they pick it up where you are at and let them know if your base is clear.
Here’s where working together with other people will really pay off. Guildmates, server mates, friends you quested with back in the day — if you can go in as a group you can focus on spreading around the flag captures until everyone has one.
The biggest problem with this achievement is that the flag is noob bait. It can help you win Eye of the Storm, but the better strategy is to take 3 of the 4 bases and hold them while letting your opponents run the flag to try to catch up. (Hint: it doesn’t work.)
What often happens, as Ihra describes so eloquently, is that the battle sometimes settles into each side holding 2 bases and fighting in a swirling fight over the flag in the center of the map. If you’re PvP averse, your best bet at that point is to hold one of the bases and adopt the second strategy (asking someone else to let you cap it.)
Here’s how it looks in practice:
There’s really no secret recipe for this task, just persistence, perseverance, and tenacity. Keep at it until you get the flag, and then run like the wind. Your orphan will keep up!
WARSONG GULCH: RETURN A DROPPED FLAG
The Warsong Gulch achievement sounds quite hard, but is easy if you play the battle as intended. Your task is simple — return your flag to your base once an enemy has dropped it. Normally, this is done by killing the enemy flag carrier (EFC), which makes them drop it. But there are all sorts of gimmicky plans to let the enemy take the flag, point to your orphan, and have them drop it repeatedly, and you know what?
I hate to say it, but sometimes those gimmicks work. Because Warsong Gulch is the smallest battleground, with only 10 players per side, your chance of getting a premade like that is actually pretty high.
I try to always talk about the battlegrounds as they are, not as I’d like them to be. And the likelihood of you finding an easy WSG during Children’s Week is good. But if you don’t, and you find yourself chasing the EFC all over the map, let me give you some tips on how to get that flag back.
The first is that you have to know where they are going before you can catch them. Your map helps immensely here, since your flag will show up on it. By watching it you can learn where they have gone.
There are three common escape patterns for the EFC — the roof, the flag room (FR), and the graveyard (GY). Each has characteristics you can pick up on the map with a little bit of practice.
First, the roof:
The roof is the best initial defensive position for the EFC. From the roof there is only one entrance and two very large escape paths, as well as a quick route to a flag capture. Most EFCs go to the roof first.
There are two ways to spot a roof runner: the little bend they make as they run up the hill to the roof (which looks like a ? or a shepherd’s crook) and that they tend to hug the front side of the base. The bend is the easiest to spot, since the only time someone runs in that area they are going up to the roof. There is no other reason to go there.
Second up is the flag room, or the FR. Some runners like to hide in the little room in the corner for protection, others like to be ready for an instant cap by standing on the flag spawn point. There are three ways into the FR, as so:
As they approach their base, they will either go straight up the tunnel (the entrance is that funny structure in the middle of the map) or up the ramp on the side, which means they will pass in a wide curve in front of the structure. These are called out as “EFC going tun” and “EFC going ramp.”
The tunnel is a straight shot into the flag room — just watch and make sure they don’t peel off to go up to the roof. The ramp offers two entrances, one to the second level, and one to the ground level. The quickest way is to turn immediately up to the second level entrance, which has a very straight pattern when you’re watching it on the map. If they veer off to the side, they’re going onto the ground floor.
No matter which level they’re on, the EFC in the FR usually hugs the back wall. If they’re along the edge of the map in their base, they’re probably in the FR.
Experienced flag carriers will often retreat to the Graveyard when trouble strikes. This puts them right in the resurrection vector of all their team’s reinforcements, as well as being defensible with a good escape route down to midfield. The resurrection vectors favor the defense here; your casualties will be sent across the map, while theirs from all over the map will be sent in as reinforcements.
If that’s not bad enough, there are three ways the EFC can escape: out to midfield, out the ramp, and out along the fence. Midfield runners can be especially dangerous if they can get back to the tunnel, or meet up with other forces down at midfield. Ramp runners are usually the easiest to kill, since they chose a bottleneck where your midfield reinforcements can trap them. Fence runners are experienced and you’re going to have to chase them down before they either run out to midfield, drop into the tunnel, or climb out on the tunnel roof and heal.
Here’s a video giving a tour of the battleground, showing the layout of the map, how to find the EFC, how to return a flag, and (as a special bonus) how to capture the flag.
Okay, is your mind spinning yet? Because now that you’ve found the EFC, you have to kill them.
The best way to kill an EFC is to bring a lot of your friends and gang up on ’em. The problem is that those friends are likely going to be trying to return the flag too (unless they’re really your friends, and they know you’re there for the achievement.) So there’s competition, but just watch the EFC’s health, and be ready to click on the flag when it drops. Eventually you’ll get it.
The other way to kill an EFC is to take them out on your own. Make sure to disable any healers who could be healing the EFC, and then focus on countering their moves while burning down their health. I’m unqualified to give class-specific PvP advice for the majority of the classes in Warcraft, so I won’t even try. If you are having trouble with this task, try dueling with some friends to get used to individual combat. But keep in mind some EFCs are practically unkillable without help.
As for the rest of the strategy? I will point you to Gnomeaggedon’s great WSG guide, Midfield is Not An Objective.
BE A GOOD GUEST
One of the biggest problems with the School of Hard Knocks and other achievements like it is that they bring people into battlegrounds with goals wildly different from the primary goal of the match – namely, winning. Be it honor farming or achievement chasing, players actively working at cross-purposes to winning is the bane of battleground players everywhere. This strife between those who are there for the PvP versus those who are there for the achievements can be a large contributor to the stress around this holiday (on both sides).
It’s odd, because the School of Hard Knocks is actually not that bad for winning battlegrounds, as achievements go. While running the flag in Eye of the Storm is not an ideal strategy, it’s at least actively contributing to victory, and all the other tasks are helpful to any strategy. There are other holiday achievements where you do nothing to help win (I Pitied The Fool) or have bad strategy (With a Little Helper from My Friends). Heck, there are plenty of PvP achievements guilty of that sin! (Hint: anything that requires you to fire a turret gun in Strand of the Ancients is bad strategy.)
So listen: you don’t have anything to apologize for by queueing for a battleground for this achievement. It’s a valid part of the game.
But in return, I’d like to appeal to you: be a good guest. Don’t leave once you’ve capped your flag, or when you think you can’t complete it. It’s equivalent to leaving an instance midway through because you didn’t get the drop you wanted. Seriously, have you ever had a tank drop in the middle of a fight because they didn’t get the loot from a boss, leaving you to deal with the adds they pulled? Don’t be that guy.
No matter your feelings on PvP or abilities in the battleground, you still have something to contribute. You’ve taken a role in a raid group, put yourself in a position where you can do some good and contribute – no matter how good or bad you think you are at PvP. Stay and defend that node you just captured. Go protect your flag carrier. Heal like you’ve never healed before.
But please, don’t leave your teammates in the lurch and drop group.
PERSISTENCE > TALENT
There’s a famous quote from Winston Churchill: “If you’re going through hell, keep going.” Keep that wisdom in mind as you work on the School of Hard Knocks. Not only do you not have to be superbly talented in PvP to accomplish these tasks, you don’t even have to be very good at PvP at all. Seriously. Watch the videos above and you’ll see success is putting yourself in the right place at the right time. Well, and clicking on the right thing. But you get the idea.
What you do have to have to succeed is persistence. Tenacity. Stick-to-it-ivness. Don’t give up. You are going to have to make multiple attempts to succeed — don’t fool yourself that it’s going to be as simple as visiting each battleground once. Give yourself plenty of time to work on this, and keep going. Keep going! A positive attitude will get you though this. Don’t give up.
A FINAL WORD
Don’t forget to have your orphan out at all times in the battleground. Nothing sucks worse than finally capping that tower in AV and discovering no one was there to watch you do it. (Trust me, I’ve done this.)
Okay, that’s all I’ve got on the School of Hard Knocks. Good luck! Go forth and achieve!
You’ll hear this saying many, many times in battleground chat. If I could only give one piece of advice for how to fight well in the battlegrounds, this would be it. It’s that important.
When you hear people saying this, it is both a reminder and a warning — make sure that when you engage the enemy, you do so at a strategic point. The key is fighting where your battle has meaning, and not needlessly dying over a piece of dirt that means nothing.
SEIZING THE FLAG
In most battlegrounds, the strategic points are the flags. In some, like Arathi Basin and Warsong Gulch, they’re the whole game. In others, they are part of a strategy, usually of resource or base control. And if there’s a flag to be captured, you should most likely be fighting next to it. An 8-second lull in the battle is enough to capture a node, but you can’t do that if you’re not near it.
The offense should do whatever they can to get to that flag. Get up the AV tower and fight around the ring of the bunker, get to the EoTS node and stay there, ride as close up as you can to the AB flag and click it when they’re not looking. In Warsong Gulch, you should be relentlessly pursuing the EFC to kill and retake your flag.
Because it takes so little time to capture a flag, defenders should remain in range and in LoS of the flag to prevent it from getting captured. This doesn’t mean all defenders should be at the flag at all times, but it does mean that some of your force needs to physically protect that flag. Depending on the terrain and situation, it’s often appropriate for some of the defense to move forward to hit the offense before they can get to the flag, as establishing distance from the flag always favors the defense. If you can push the offense away from the node, then they are less able to capture it. But you have to be near it to protect it.
Now, there are strategic and tactical reasons for not fighting at the flag, almost all defensive. The bridge at Dun Baldar and gatehouse at Frostwolf Village in Alterac Valley come to mind; they give too much tactical defensive value to yield unfought. There can be tactical value in the surrounding structures and terrain which you should take. But the further you get away from the flag, the less safe it actually is.
This idea should be straightforward. You have to be near the flag in order to take it. You have to take the flag to win it. Ergo, fight near the flag.
But that’s not the only reason why you should fight at the flag.
GRAVEYARDS AND RESURRECTION VECTORS
Arathi Basin is the canonical Fight at the Flag battleground. There are 5 nodes arranged in a diamond shape around a central point. Each node has a flag next to a building of some sort, and can be captured by clicking on it and channeling for 8 seconds. When you capture a node, you control the resources from that node, and you gain control of the adjacent graveyard. The nodes are interconnected through a series of roads and bridges.
Here’s a map of Arathi Basin. (You’ve been there before, I hope.) The white circles are the nodes with approximate flag location, the squares are the graveyards.
The road areas in pink are bad places to fight. Even though they are choke points, they are the most worthless areas of the map to contest, and not just because they aren’t near a flag.
It’s also because they’re not near a graveyard.
Death in PvP is a temporary thing. It’s like a 30 second penalty that strips all of your party buffs. It also sends you to an out-of-the-way location to rez; in AB it’s on the other side of whatever structure is at that node. So if you die while defending a node, you have up to 30 seconds to wait to get rezzed, another 5 seconds to rebuff, and then 5-10 seconds to get back to the flag. So depending on your luck, you might be back in 15 or 45 seconds. As long as the flag stays in your team’s possession during that time, all defenders will come back.
The offense has a tougher time of it. The penalty for dying is getting sent back to a graveyard you do control, which may be on the other side of the map. So while you might have an epic battle going for the Lumber Mill, if you haven’t captured any graveyards yet, your reinforcements are going to go back to the spawn point, not to the Stables or Farm — even though you may have assaulted those flags. Graveyard placement is vital.
Let’s continue with Arathi Basin to illustrate this point further. We’ll take a traditional 5/5/5 middle offense versus an 8/7 hook rush.
The Farm and Stables are assaulted as a matter of course. The Horde attacks strong-side (Lumber Mill and Blacksmith) while Alliance sends 5 to each node. Assuming no huge individual imbalances at any given fight, they should result in the following map:
The vital thing to notice here is that NO graveyards are captured yet, only the spawn points. Everyone is on offense, so death means you get sent halfway across the map. Because the Horde outnumbers the Alliance at their chosen nodes, they take them with fewer losses than the Alliance are able to inflict. So the Alliance has 2/3rds of their team sent back to their spawn point, while far smaller percentage of the Horde resets.
While all this is happening, the close graveyards (Stables, Farm) start flipping as the nodes are actually captured. However, the battle is already turning against the Alliance:
With only two nodes solidly in either faction’s control, the Horde is in a much better position as they move into the next set of fighting because of the graveyards. As 2/3rds of the Horde assault the Stables, they are about to have two graveyards come under their control. If they fought at the flag and assaulted the node early in the first fight, then they will have one or two nearby graveyards to reinforce the Stables fight. The Alliance is in worst shape; they have a weak force entering hostile territory, with reinforcements coming from three sides.
Removing the vectors, this is where your people will be.
This is why you fight at the flag. Right here is the entire match — if the Horde can take the Stables Graveyard from the Alliance, then all reinforcements from the main battle will go back to Trollbane Hall, completely isolating the Alliance offense. If the Horde fails to take the Stables, they still have the close graveyards of the Blacksmith and Lumber Mill to regroup at and hold to apply pressure on the Stables and Gold Mine.
If the Alliance can take the Farm graveyard, they strengthen their position and disrupt the Horde’s march to a 4-5 cap. They’ll send the Horde back to the spawn point or the Blacksmith. They’re at a disadvantage compared to the Horde due to having to divide their forces between the Mine and the Farm, but it’s the best they can do with the situation. If the Horde shifts away from the Lumber Mill, or sends troops back from the Stables to take the Gold Mine, the Farm offensive is in real trouble.
I’ve been talking in terms of holding engagements near the flag at each node. Let’s consider what happens if you fight in the road, instead of at the flag.
If the Horde engages away from the Stables flag:
Horde casualties will go back to the Blacksmith, or maybe the Lumber Mill (depends on which road and where.)
Alliance casualties will stay at the Stables.
If the Alliance engages away from the Farm flag:
Alliance casualties will go back to the Gold Mine, which will be vulnerable to attack.
Horde casualties will to stay at the Farm.
If they both do these things, then the map will stay exactly as it is right now, with Horde leading 3-2.
If one group fights at the flag and takes the graveyard away from the opposition, however, they increase their odds of winning dramatically. Alliance has a shot of going 3-2, and the Horde can dominate with a 4-1 (and should go for a 5 cap at that point.)
Here’s what phase 3 looks like if both sides fight at the flag.
Now, the Horde still has the upper hand at this point, but the Alliance has driven a wedge into their march to a 5 cap. Whichever side is able to continue to send dead opponents away from nodes will come out on top, and the only way to do that?
That’s right. Fight at the flag.
UNIVERSAL LAW
Arathi Basin is one thing, where the graveyards and nodes are right next to each other. But does that mean that “Fight at the Flag” is universal?
Yes. Yes, it does.
In Warsong Gulch, you should be fighting to protect your flag carrier or trying to kill the enemy flag carrier. All other places where you fight — midfield, in the enemy base, in your base — all need to be considered with where the two flags are relative to you. I’m not against fighting in midfield per-se; it just needs to be done with an awareness of what you’re doing (forward defense of your flag, clearing a path for your flag carrier, etc.).
In Alterac Valley, the towers and graveyards are separate, but each one requires several minutes between assault and capture. If you do not defend the flag once you’ve assaulted it, you deserve to have it recaptured by the enemy.
In Eye of the Storm, the bases serve as the flags, and are what you should focus on. The presence of an actual flag confuses things, but you really don’t want to fight at it unless you have to. This is the only place where I’d say “Fight at the Base” instead of “Fight at the Flag,” because 3 bases > flag.
In Strand of the Ancients, the walls and graveyards are separate, and while you have to carefully manage which you capture, the walls are your main objective. Getting stuck in a firefight on the beach means your demolishers can’t hit the walls. (Consequently, fighting on the beach or on the roads favors the defenders.)
In the Isle of Conquest, control of a node equals control of a nearby graveyard, as well as special abilities or vehicles that you need to win. If you can capture the enemy Keep, you make it very difficult for defenders to reinforce the generals.
Fighting at the flag is the one strategy that applies to all of the Warcraft battlegrounds. (Yes, even EotS. Hush.) You fight at the strategic points to both seize control of the key resources of the battleground and to redistribute your opponents to your advantage.
Marks of Honor are one of several types of PvP currency in the game. They are awarded from the various battlegrounds for participation: 3 for winning, 2 for a tie, and 1 for a loss. You can have up to 100 of each; check your currency tab to see them.
Wowhead has a great feature allowing you to view what a given object is currency for, so below are the types of Marks you can get and what you can buy with them.
Some of these rewards are quite good, depending on your level.
THE OLD WORLD BATTLEGROUNDS
The first three battlegrounds in Azeroth (Warsong Gulch, Arathi Basin, and Alterac Valley) all have similar types of rewards that are available for a combination of honor and marks.. You can purchase specific types of gear from either vendors at the site of the battleground, or from your faction PvP quartermasters in Stormwind or Orgrimmar.
The Warsong Gulch rewards are actually quite good for their level, if you can get them early enough. Several WSG pieces (the necklaces, rings, cloaks and staffs) are best in slot or near-best in slot items for 19 twinks, which means they’re good for leveling, too. The Arathi Basin rewards are also outstanding, especially the boots. I’ve written about them before, but I love them primarily because you can have both a riding and walking speed enchant on them.
The gear you get from Alterac Valley marks used to be great, but since it’s available at level 55, Outland greens that outclass them in every way are right around the corner at 58. AV marks can get you a very sweet mount and cool Battle Standard, which is always nice.
Combinations of these marks can buy very nice rewards from the faction quartermasters. Of particular value to collectors are the PvP mounts (Alliance, Horde) that used to be a cheap way to get an epic mount when such things were expensive, and tabards, which can be gotten either through marks (WSG, AV) or reputation (AB). You can also get some great looking level 60 PvP sets for RP, though again — anything that’s level 60 from the Old World is outclassed by equivalent level items in Outland.
EXPANSION BATTLEGROUNDS
The battlegrounds from Burning Crusade and Wrath of the Lich King are fundamentally different from the previous ones because they don’t have a physical location or gateway you can visit in the world. They might have a place in lore, but they don’t exist within the World of Warcraft. So there aren’t battleground-specific vendors, and with that lack comes a corresponding lack of cool gear and neat toys.
Eye of the Storm marks can at least give you access to some level 70 PvP gear, which can serve you well as you level through Northrend. Not that it’s great leveling gear per se, but it has good PvP itemization and is some of the first resilience pieces you can get, which does make a difference in a battleground.
Strand of the Ancients and Isle of Conquest marks can’t buy you anything. Perhaps in the next expansion you’ll be able to purchase the current PvP gear with them, but for now they are almost worthless. Keep in mind I said almost worthless. We’ll get to that in a bit.
WINTERGRASP
Wintergrasp marks are different than the other Northrend marks of honor, perhaps because Wintergrasp is itself different. It exists on the map. There are multiple vendors who sell great PvP gear for level 80 characters that can only be purchased with Wintergrasp Marks. This gear is valuable not only because it’s an alternate currency for getting endgame PvP gear, but because the gear is itemized differently than the standard Gladiator gear, allowing you to balance out Crit and Haste and not be overly gimped in one direction or another.
I’ve written a lot about the gear you can get in Wintergrasp, because it’s the one battleground for level 80 characters where the marks really get you gear you can and should use. But it’s not the only reason Wintergrasp Marks are valuable.
THE VALUE OF A MARK
This post was prompted by several terrible battles where people were yelling to either zerg Drek and ignore all the towers in Alterac Valley (“for quick marks! so we can get honor for gear!”), or forfeiting the fight in Arathi Basin to “collect their Mark and get out.”
Both of these actions confuse me a bit, because those marks are less valuable than the honor you get from fighting a good fight. They’re nice to have for later, but a good fight where you meet more of the objectives will yield more honor, and isn’t that why you’re in Alterac Valley at level 80?
Apparently not.
Determining the value of a battleground Mark of Honor lies entirely upon your character’s goals. While leveling, the marks have value for the gear and stuff they can get you. At level 29, the WSG and AB rewards are pretty darn good, and you need marks to buy them!
But marks lose this particular value as you level, because the gear they purchase loses value. My boots from Arathi Basin served me well, but they now collect dust in my bank. So while there’s real value associated with the gear you can get from marks, it decays over time and expansions.
(You can argue that some of this gear has great RP value, which is absolutely true. The level 60 PvP sets look fantastic. But fashion has a variable value because it is so highly subjective.)
The Old World marks definitely have value if you are a mount or tabard collector. The 6 epic mounts and 4 tabards you can buy with them go a long way towards some of those achievements and there are people (myself included) who have ground out battlegrounds solely for this reason. But, much like RP PvP gear sets, this value is subjective. Not everyone needs dozens of epic mounts. And with prices and level requirements slashed on epic mounts, the gold value we could have assigned to these Marks (90 total marks = 60 AV marks = 1 epic mount) has decreased considerably.
The New World marks have even less value than the Old World ones in terms of purchasing power. Eye of the Storm marks at least can help get you some PvP gear, but Strand and Isle marks buy you nothing. So as you level up, one set of marks is losing the value it once had, and the other set starts out with little value and doesn’t gain anything as you go.
So what’s left to do with these marks at level 80?
The good old standby, convert them to honor. Honor is a universal currency amongst PvP, and can be converted directly to gold. So honor it is.
Concerted Efforts / For Great Honor are repeatable quests that allow you to convert 1 mark from each battleground available to your level (except Wintergrasp) into honor. With each new battleground’s release, new marks have been added and the honor rewards increased. Currently, there are 6 marks required for 1489 honor, so any given mark is worth 248 honor. If you figure that each battleground takes an average of 20 minutes — you have to do Warsong Gulch and Arathi Basin, don’t forget — then we can start really assigning value not only to the marks themselves, but also to the methods used to getting them.
Six marks from six battlegrounds, each lasting 20 minutes each… that’s 1489 honor divided by 120 minutes, or 12.4 honor per minute. It’s really bonus honor per minute, because you’re already accumulating honor by being in a battleground, which can vary wildly from battleground to battleground. Let’s look at the two scenarios that drove me up a wall last night, running the AV Blitz and giving up in Arathi Basin.
SCENARIO 1: WINNING ALTERAC VALLEY
I’ve been in Alterac Valley battles that netted over 3000 honor for the game. Sure, they have been 45-minute long slugfests, with half of our towers down and honorable kills in the thousands, but Alterac Valley is like that sometimes!
Alterac Valley rewards bonus honor based upon objectives, which you can see on the official AV page:
1*20.9 honor for every wing commander (3) that returns to base
2*20.9 honor for every tower/bunker you still have
2*20.9 honor for your Captain surviving
3*20.9 honor for every tower/bunker you destroy
3*20.9 honor for the captain you killed
4*20.9 honor for winning
So, if all your towers and captain are up while all the enemy’s towers and captain is down when you win, you get (62.7+167.2+41.8+250.8+62.7+83.6) = 668.1 bonus honor for the match.
Now, compare this to the Alterac Blitz, where you take nothing, tank the adds, and kill the general in under 6 minutes. You get 83.6 bonus honor for each match because you win, a difference of 584.5 honor.
For the sake of argument, let’s assume that you’ve got optimal conditions in both cases and are pretty much facerolling the opposition. Waiting for all the towers to go down adds another 4-5 minutes or so to the standard Blitz, which itself takes about 5-6 minutes. So let’s call it 5 minutes for the Blitz and 10 minutes for the Stormpike/Frostwolf Perfection win to make it easy. We should also add 1 minute at the start of each game in the cave, and another minute for the queue. So 7 minutes per Blitz, and 12 minutes per Perfection.
The Blitz’s strength is in the number of marks it generates — twice as much as for the Perfection win if we look at the time fighting, and almost twice as much with the queue and start times.
Over the course of an hour, you could conceivably run 8.57 AV Blitzes, giving you 25.74 AV Marks for a conceptual value of 6337.14 honor (or 105.6 honor per minute).
During that same hour, you could run only 5 Perfection AVs, giving you 15 AV Marks for 3720 honor.
However, those 5 Perfection AVs grant 3340.5 honor from reaching all the conditions described above, for a total of 7060.5 honor , or 732.36 honor more than the Blitzes. That’s 117.67 honor per minute.
This also doesn’t take into account the increased number of HKs a Perfection AV generates over a Blitz, since people are actually defending nodes, capping graveyards, things like that. So that will need to be factored into the model somehow, but it just strengthens the point. Perfection gives you an edge in honor versus the Blitz — not a big one, but there
Now here’s the kicker — this direct comparison assumes that you are running not only AV, but all the other battlegroundstoo to generate marks for turn-ins. So the more marks you generate, the more time you need to spend in other battlegrounds — battlegrounds that reward less honor per minute.
Consider it this way: for every AV marks you generate, you will have to win 5 other battlegrounds to realize the value of that honor. So the fewer marks you generate, the more honor you get overall. Using Ihra’s holiday HPM results:
AB: 79.19
WSG: 83.92
IOC: 86.44
EOTS: 88.56
SOTA: 97.59
AV: 146.42
… you will have to spend your time in battlegrounds that yield 56.6% – 66.6% less honor per minute than Alterac Valley. Now, some of the bonus honor from objectives is already baked into Ihra’s AV value, so we can’t distinguish between the Blitz and the Perfection values. But we don’t have to! Look at it this way: Perfection generates 15 marks per hour, while Blitz generates 25.74 marks per hour (1.716 times more).
So, assuming all other things in those other battlegrounds are equal, you will need to spend 1.716 more time in those battlegrounds to convert those marks to honor. If it takes you 10 hours to match all the marks you get from Perfection, it takes 17 hours to match the marks from the Blitz. That’s seven more hours at 2/3rds honor.
In that 7 hours, you could run Alterac Valley for 61496.4 honor, or those other 5 for 35700 honor, for a net gain of 25796 honor.
That’s half a piece of Wrathful gear.
To sum up: not only is blitzing AV for marks bad because you aren’t getting the bonus honor for reaching the objectives, it’s doubly bad because you end up spending less time in Alterac Valley.
And no matter how you value honor (gear or gold), that’s a bad thing.
SCENARIO 2: LOSING ARATHI BASIN
Having laid out why it’s bad to value marks over achieving all the victory conditions in a high HPM environment, what about deliberately losing Arathi Basin to get it over with, collect their marks, and move on.
The competitor in me hates these people. I’ll come right out and say it — I hate people who consider it okay to lose. But do they have a point? Is it logical to adopt this strategy?
The reason I was in Arathi Basin last night was because it was the daily BG quest for me. So to me, the marks had no importance — only victory. Victory meant 1489 honor and 25 Arena points, which for a 20 minute battle is +74.45 honor per minute. The marks — at best — were 248 honor apiece, but I was really there for the Arena points. So a win would get me +2233 honor over whatever I got out of the battleground, while a loss… well, a loss gets me +248 honor. Yikes.
I have to assume the people clamoring for us to lose quickly so they can claim their marks, though, were not there for the daily battleground quest. Why were they there? I’m not honestly sure. Perhaps they were grinding out a few marks for some old gear or some mounts, but I have a tough time thinking that’s the primary motivation behind their desire for a quick mark.
What I’m left with is that they are looking for marks for the turn-in quests, which means that perhaps a loss really is the best use of their time. Giving up certainly requires the least amount of effort! If you aren’t trying to reach any of the goals of the battleground, or even engage in combat to get honorable kills, then you’re basically discounting all the potential honor you could get from fighting.
In a high HPM battleground like Alterac Valley, that attitude is crazy. Even a loss gives you a chance to get good honor, which is one of the reasons why it’s such a good battleground to farm honor in. And fighting back to take objectives gives you honor no matter what. But Arathi Basin doesn’t give nearly as much total honor, and since the resource accumulation scales non-linearly, a side with 4 or 5 bases is going to win in a very, very short period of time. How short?
If you control 1 base, you gain 10 resources every 12 seconds. 32 minutes to get to 1600.
If you control 2 bases, you gain 10 resources every 9 seconds. 24 minutes to get to 1600.
If you control 3 bases, you gain 10 resources every 6 seconds. 16 minutes to get to 1600.
If you control 4 bases, you gain 10 resources every 3 seconds. 8 minutes to get to 1600.
If you control 5 bases, you gain 30 resources every 1 second. 53.3 seconds to get to 1600.
Resources control bonus honor — I think it’s 20.9 honor for every 260 resources gained, or 160 on a holiday weekend. (Some sources say it’s every 330, but more say 260.) The winning side will therefore get 128 honor from resources, and then another 20.9 on top of that for winning, for a total of 149 bonus honor. (Holiday increases that to 209 and 230, respectively).
Let’s put that into the perspective of Alterac Valley: if you do nothing other than kill the enemy captain and general, you get 146.3 honor, about the same as winning Arathi Basin. Every tower you take down is additional 62.7 honor, so the conservative strategy of taking out the captain, towers, and general will net you +250 honor more than winning Arathi Basin. All in about 8-12 minutes, a time which could only be met by controlling 4 bases. The only conditions when winning Arathi Basin is more profitable than Alterac Valley is when you can control all 5 bases, making it an extremely quick small burst of honor.
Compare that to the established value of a Mark of Honor: 248 honor. If you win, you get three, or 744 honor, on top of the 149 bonus honor from the objectives for a grand total of 893 honor when all is said and done. If you lose having gotten to, say, 800 resources, you’ll get one mark worth 248 and 64.3 bonus honor from objectives, but at the cost of prolonging the match at least 15 minutes for that additional 64 honor. (I am ignoring the honor you can get from HKs during that time.)
So staying and fighting for that additional 800 resources nets me +4.28 bonus honor per minute. Which is terrible. I mean, that’s an awful return on your time.
Assuming that it is not your daily battleground, and you’re there just for honor, giving up when you start getting behind starts looking like a valid strategy. Allowing the enemy to 5-cap ends the battle quickly without materially changing your outcome. You are still going to walk away with 250-500 honor, tops. Staying and fighting might give you some HKs and associated honor, but it’s going to be tough going. Whereas if it is your daily battleground, the stakes for winning are much higher, so gritting it out actually makes sense. If you’re getting an additional 2000 honor out of a win, spending 20 minutes getting it is still +100 honor per minute. You can afford to slug it out.
But if you’re just playing for marks to balance out all those sweet AV marks in your bank? Letting them 5-cap actually makes sense, because the single AB mark you get has more value than fighting back for a win. Surrender is a viable option.
Ugh. I feel dirty writing that.
KNOW WHEN TO HOLD ‘EM
The biggest problem with Marks of Honor in level 80 battlegrounds is that they have no intrinsic value outside of the honor they confer. And while I’m generally a fan of having a few, universal currencies, in this case the mechanism of the turn-in quest means that a mark from a high HPM battleground is equivalent to the mark from a low HPM battleground in terms of opportunity cost. To realize the value of an AV mark means you have to spend the time in WSG and AB getting their counterparts; but spending time in WSG and AB means you are getting less honor for your time spent playing than simply going back and playing more AV. Which is madness!
This is one of the flaws of the current PvP reward system. While it’s great to have a unified set of currencies, and the three-tiered model works well in PvE and PvP, the incentives for winning need to be better for the worse-off battlegrounds. It’s like if when running heroics through the Dungeon Finder you had heroics with wildly different numbers of bosses and times to complete, and worse, the ones with the fewest bosses (and therefore the fewest Emblems) took the longest to do, while the ones with more bosses were faster and dropped better loot. No matter how enticing you made the daily quest reward in this instance, players would still look at those hard ones and either take the debuff and bail, figuring they could do something better with their time and try a different one later, or grit your teeth and smash through it as quickly as possible to get it over with.
Replace Emblems with honor and you have the state of battlegrounds and the daily bg quests today. Even having a Battleground Finder to randomize the quest location wouldn’t overcome the discrepancy between battlegrounds in the amount of common currency they reward.
Arathi Basin is one of my favorite battlegrounds. It’s one that uses the most small unit tactics, requires great communication and teamwork, has interesting, challenging terrain, and allows for many, many ways to win. It is wrong on so many levels to have to look at the incentives for playing it and conclude that if you’re not in it for achievements or reputation, you’re sometimes better off forfeiting, losing quickly, and taking your mark than sticking it out.
WHY WE FIGHT
When you zone into Alterac Valley, you’re surrounded by people with a lot of different reasons for being there. There’s a lot of incentive for people to fight well, and while the strategy for optimal gains can be debated, all the incentive is to fight the whole way through. Even a turtle in AV can be profitable (and a hell of a lot of fun.)
When you zone into Warsong Gulch or Arathi Basin, though, you have to wonder: why are these people here? This isn’t the best place for me to grind honor for good gear (or money), so why are people there? Are they trying to realize the honor they have stored up in other marks? Are they grinding reputation, or achievements? Are they completely lost?
Or, are they there to have fun, and maybe, just maybe, win?
The key difference between PvP and PvE is that the opponents have to be motivated in PvP. Winning in a raid means downing the bosses and collecting the loot; your incentives are clear. But you never have to consider the incentives of the trash mobs or bosses; they’ll be there, giving their all, no matter what. In PvP, you have to give players on both sides a reason to show up, a reason to compete, and a reason to win.
More than anything else, this is the problem facing endgame battlegrounds today. How do you motivate the losing side? These battlegrounds are still exhilarating places to spend an evening; simple to learn the basics, but hard to master. Competing in them is fun, and can be rewarding in and of itself.
But when the tangible rewards for doing other, somewhat similar activities are far superior, you have a conflict between doing what is right — fighting hard until the end — and doing what is best for you.
Surrender should never be a viable strategy for victory.
Cynwise's Warcraft Manual is a weblog about many facets of the World of Warcraft: PvP battlegrounds, digital avatars, warlock theory, and having fun with alternate play styles are common topics.


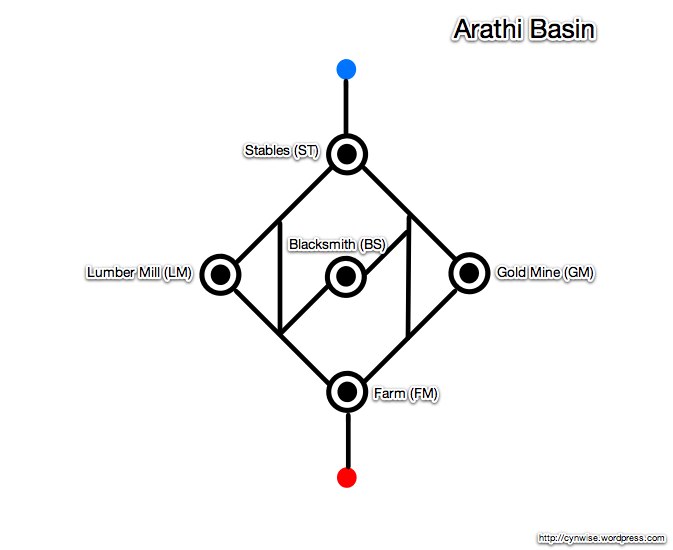